
You wanted to know how to make glow effect photoshop in Photoshop and make any object glow in the easiest and efficient way? Then you clicked the right link.
Now that you’ve taken the photo, you may wish to add a sci-fi touch to it or you may have a customer who requests that you alter his or her headshot in a futuristic style. To give an item a magical appearance, adding shine is always the finest option.
This type of effect can also be used in compositions where you want to add fantasy and a magical look to the whole composite.
For example, you have to make a movie poster for fantasy and magical type of movie or you have to make a flyer or card for the magician.
In these cases, this effect could be very useful and also you can add this cool glow effect to your own pictures because it looks so cool and magical.
In this article, I’ll show you how to make glow effect Photoshop and make anything glow in Photoshop in the most simplest and realistic way.
Related: Learn to make Glowing Eyes in Photoshop like Fantasy designs In a simple and professional way.
So, Let’s Go For It!
Table of Contents
Opening Image In Photoshop
First of all, you have to open your image in which you want your object to glow in Adobe Photoshop and glow effect Photoshop. For this, you can simply drag and drop on the Photoshop interface to open the image.
You can also go to File > Open on the top left corner.
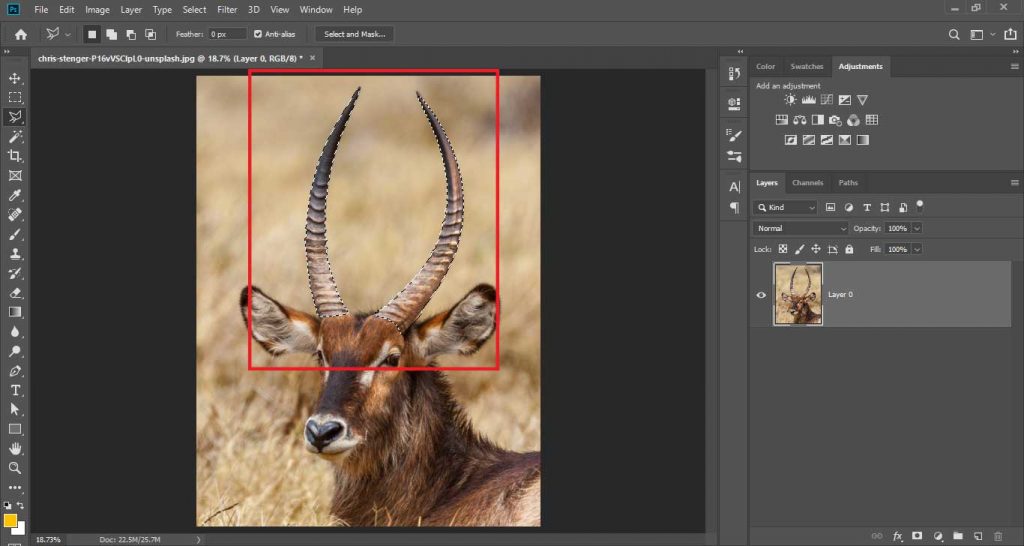
In my case, I have a picture of deer which I’ve opened in Photoshop and I’m going to make his horns glow.
The process is same for any object you want.
Selecting The Object To Make It Glow
The next thing you have to do is to select the object of the picture on which you want to add a glow effect.
Like in my example I’ve selected the horns of deer because I wanted to make them glow.
You can use any selection tool to select that part but you have to be accurate as that selected area will be the area from where the light will be immerging.
It means that area is the part from where the glow will be coming.
So we have different types of selection tools in Photoshop, You can use Marquee or Lasso Tool but the best in my suggestion is Pen Tool.
Making Glow Effect Photoshop
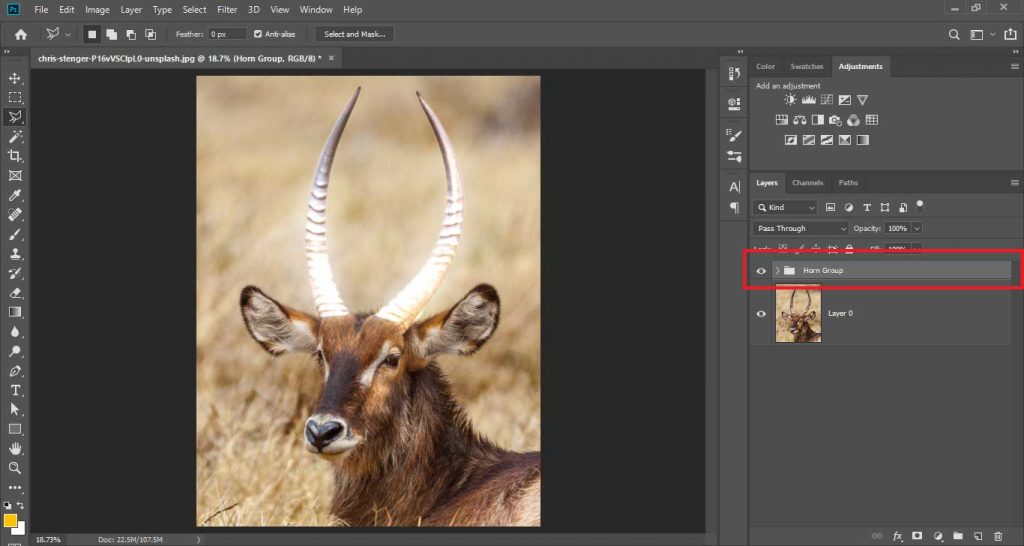
After selecting the object, Press Ctrl + J or Command + J to make a duplicate of that object in the new layer.
Now click on the object layer in which you have only object as in my example I have horns selected and separated in the new layer.

Now right-click on the layer, and click on Convert To Smart Objects to make it a smart object so that the changes on it will be non-destructive.
After that, we have to make three copies of the object layer i.e. horns layer.
To do that right-click on the object layer and select Duplicate Layer.
You can just press Ctrl + J or Command + J to make a duplicate of the layer.

Change the Blending Mode of the duplicated layer to Linear Dodge, this will make the horn look glowing and lightning but we have to make it realistic.

Repeat the process to make 2 more duplicates of the new layer.
Adding Blur To Object Layers
Now you have 3 layers of the object with Blending Mode of Linear Dodge that is making the object lightened.
Select the first duplicate layer and Go to Filter > Blur > Gaussian Blur.

Add a blur of radius 5 pixels to the first duplicate layer and select OK.
Then Select the second duplicate layer and Go to Filter > Blur > Gaussian Blur.
Add a blur of radius 100 pixels to the second duplicate layer and select OK.
Then Select the third duplicate layer and Go to Filter > Blur > Gaussian Blur.
Add a blur of radius 500 pixels to the third duplicate layer and select OK.
These blurs will add a fading effect to the glow that makes it realistic and good-looking.
Adding Hue/Saturation Layer
Now select all 4 layers by pressing and holding Ctrl or Command in which we have object separated (i.e. one original horns layer and three layers with Linear Dodge and blur) and make a group of them.

To do that select layers by holding Ctrl or Command key and press Ctrl + G or Command + G to make a group of them.
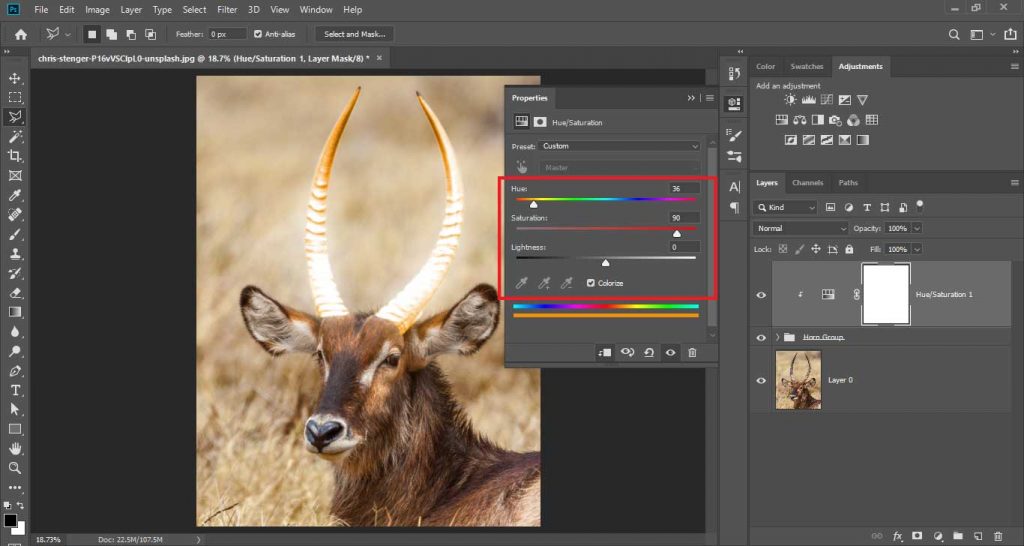
Now go to Layer Panel and add a Hue/Saturation Adjustment Layer above that group.

Right-click on the Hue/Saturation Adjustment Layer and click on Create Clipping Mask to make this adjustment layer only limited to Group.
After that open the properties of Hue/Saturation Adjustment Layer and click on Colorize.
Now increase the Saturation to about 70+ to 80+ and change the Hue according to your choice to select a color of glow light.
Making Image Darker
Now you have your glow ready but you have to make your whole image darker because we want only the object to be lightened.
To darken the image make a Brightness/Contrast Adjustment Layer or Curves Adjustment Layer.
Drag and place the Brightness/Contrast Adjustment Layer or Curves Adjustment Layer below all layers and groups but above the original image layer.
Then decrease the brightness to a value of your choice.
This will make other image parts darker to make the illusion of glow on the object.

Masking Brightness/Contrast Adjustment Layer
Now we have to make the image brighter from the surroundings of the object as light emerging from the object falling on the surroundings.
For that select the mask of Brightness/Contrast Adjustment Layer and select Brush tool.
To do that select Brush Tool and make sure your Foreground color is set to Black.
In the settings of Brush Tool, take the Opacity to 100% and Flow to 30%.
Now with Soft Round Brush paint over the surrounding areas of the object with black color make the surrounding areas brighter from other image parts.
This will make it look like light is falling on these surroundings.

Adding Color Lookup
Now you have your glow ready but you have to make your whole image more night-like to make the object more glow.
To do that you have to add a Color Lookup layer above the background layer.

Then in the properties, from 3dLuts you have to select Moon Light 3dLut to make the environment of the image darker and night like.
Now decrease the Opacity of this layer to about 60%.
This will make other image parts darker to make objects more glowing.

Watch For More Info:

I’m a Graphic Designer with 5+ years of experience. Specialized in Adobe Photoshop.
Get Info About Any Photoshop Editing, Photoshop Manipulation, Logo Design, Flyers, Business Card, Cartoon Portrait and any type of work-related to Graphic Design and Photoshop Editing.


