
If you are a designer then in Photoshop many times you need to use gradients so you have to know all about how to do a gradient in Photoshop, how to use gradients in your designs, how to use them in your text, how to use them in your pictures or shapes and also how to create your custom gradients.
As we know Gradients are trending for decades in the design industry whether it is a poster or it is banner or it is a business card or it is a logo or anything which is related to graphic design. We use gradients in most of our designs so in order to become a good graphic designer & in order to learn Photoshop, we should be aware of using Gradients & making Gradients in Photoshop.
In this article, we are going to discuss all gradients and how we make them in Photoshop using the gradient tool and also how we make gradients in Photoshop using Adjustment Layers. Also, we are going to see how we can use gradients to make Appealing Designs, Text & Logos. This is the ultimate guide to all you need to know about Gradients so Bookmark this article & learn it.
Let’s Go For It!
Table of Contents
Make Gradients Using Gradient Tool
First of all, we have to create a new document to add gradients to that. In order to do that in Photoshop, go to File > New. A window appears, allowing you to name the document as well as change its dimensions, resolution, and color mode. Name the document of your choice. Set the file to the following dimensions:
- Width to 1000 px
- Height to 1500 px
- Orientation to Landscape
- Resolution to 300 px or 72 px
- Colour Mode to RGB
Then click Create.
Now we have to add a Gradient to the whole document.
For that, click on Gradient Tool in the toolbar then you’ll have many options on the top bar. Like selecting a gradient from given Gradients or selecting any style for Gradients.
If you have an older version of Photoshop like CC 2019 or 2018 or older version than that then there are less amount of gradients that are already given but if you are using the latest versions of Photoshop like 2020,2021 or 2022 Then we have many gradients in our Photoshop. Later we’ll learn How to create our own custom Gradient in this article.
You can select one of them from here and in order to make a gradient you have to click on your canvas document and drag it to a certain point. The distance from one first click & to the last point determines how much the first color is going to be blended in the second color.
This is how we can create a gradient using the gradient tool from the toolbox.

Make Gradients Using Adjustment Layers
Now let’s talk about how we can create a gradient using Adjustment Layers in Layers Panel.
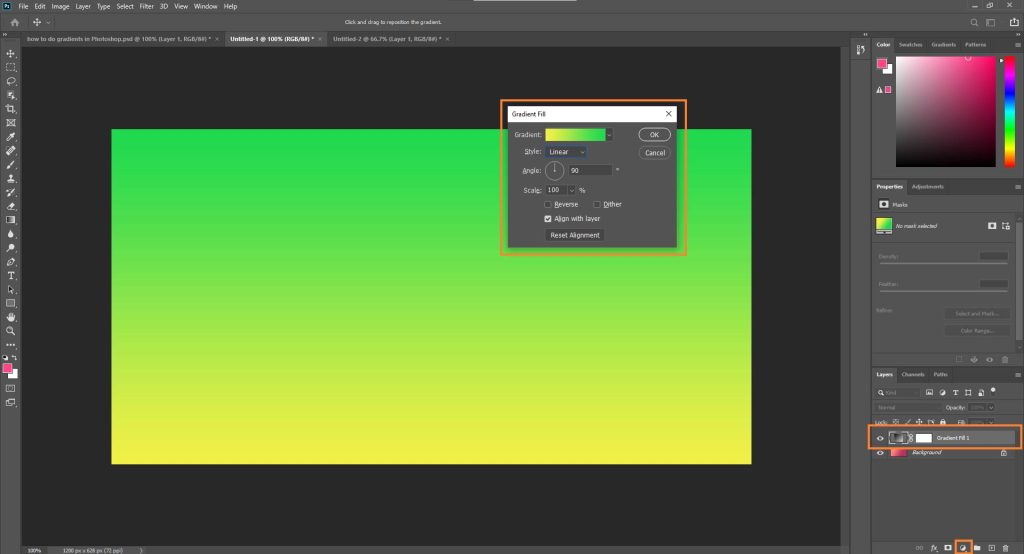
First of all, Click on the Adjustment layer icon and click on Gradient. This will create a new gradient adjustment layer and there will be a dialogue box that will show which gradient design, colors & style you want to add. Now in this dialogue box you can then you can change the angle of the gradient can decrease or increase the scale of the gradient and you can also select one of the types of gradients like a linear gradient or radial gradient it will it’s totally up to you.
After making adjustments, click OK.
By this method, you can create the gradient in a new layer and you can change this whenever you want just by double-clicking on the Gradient in Layers Panel.
Creating Your Own Custom Gradient
We learned how to use a gradient, Now we have to understand how to make our own gradients with our own colors and then how to save them for later use.
To do that, click on go on layer panel, and in adjustment layers select gradient.
This will create a new layer of the gradient as we did before. Then if you click on that arrow of the gradient then we will see there are all available gradients we can use in our designs but if we click on the gradient bar, this will open another dialogue box in which we have all our gradients
Here also we have a bar which is showing the gradient colors.
We have a marker on the right side and a marker on the left side. To change the colors of gradients, first, click on the right-side marker you will see it will show the color of that marker below click on that Color option and select a color that you want.
Then you have to click on the second marker and use the color you want.
You can also add a new color marker by clicking any point on the line and then clicking on that to change the color to whatever you want. In this way, you can make your own Gradient using different colors.
How to Save Custom-Made Gradients in Photoshop?
Now In order to save that gradient that you made, you have to click on the New button in this dialog box.
The new gradient is saved and you can use it whenever you want.
This is how we can create our own gradients in photoshop.

Now let’s wrap up what we’ve learned so far so that we can proceed to how to make designs from these gradients. Here we have learned how to use gradients in Photoshop from already given Gradients, we have learned how to create our own gradient and we can save that gradient as well.
Using Gradients in Our Designs
Now let’s talk about real-life examples in which we can use our gradients to make our designs appealing & eye-catching. We have three scenarios in which we can use gradients in our designs.
First, we can add a gradient on a logo or any shape we want which is to be used in our design.
Secondly, we can add gradients to text in our designs.
Thirdly, we can add Gradients to the backgrounds of our designs we are going to see how we can make a poster by using gradients as backgrounds.
How to use Gradients on Logos or Text in Photoshop
If we have to add the gradient to our logo, text, or any shape in our design, we have two ways of doing that and those are:
Adding Gradient Using Gradient Overlays from Blending Options
The first method of how we can add our gradient to a logo, text, or any element is by using gradient overlays.
In order to do this, let’s just drag and drop our logo into our document.
Important Note: Make sure the logo doesn’t have a background. It’s just with no background.
Then go to Layers Panel, right-click on the logo layer, and then click on Blending Options.
This will open a new blending option dialogue box.
In this dialogue box, we have many options to select for our layers. One of them is gradient overlays, we can add gradient overlays on our text, logos, or any shape.
After going to the Blending Options, click on Gradient Overlay.
We have a lot of options in Gradient Overlay, we can select our gradient, we can select its opacity, and how much we want to show it on our element.
Select your Gradient from there. Select the Opacity with what you want Select the Angle you want and click on OK.
This will add a gradient to your element. This is the best way to add gradients to your texts or anything you want.
Adding Gradient Using Clipping Masks
The second method is using a gradient on any logo, text, or shape by creating a clipping mask of a Gradient Layer on it.
Related:
- Fill vs Opacity in Photoshop
- How to Make a Business Card in Photoshop (Premium Quality)
- Add Stylish & Professional Borders in Photoshop (Elegant Styles)
First, we have to create a document then we have to add a logo or shape to it. We can just drag & drop the logo from the Folder.
Important Note: Make sure the logo doesn’t have a background. It’s just with no background.
Then we have to create a gradient layer as we did before.
- Go to Layer Panels.
- Click on the Adjustment Layer icon.
- Then click on Gradient.
- This will create a new Gradient for you.
- Now you can select any Gradient you want to add to your logo.
- Then after selecting and arranging your gradient click Ok.
First, you have to make sure your Gradient Layer is above the Logo Layer and the Logo Layer is below the Gradient Layer.
Hold the Alt or Option key (Alt key for Windows and Option key for Mac) and while holding it left click on the line between the Gradient layer and the Logo layer. This will border the gradient only to be applied on Logo only not the whole document. This is another method of how you can add Gradient to your Logo, Text, or any shape in Photoshop but the first one is the best one.
Making a Whole Design Using Gradients in Photoshop
Now we are going to discuss how we can create a banner or a poster or a business card or any whole design using gradients.
First of all, we have to create a new document to make a design. So go to File > New. Set the file to the following dimensions:
- Width to 1000 px
- Height to 1500 px
- Orientation to Landscape
- Resolution to 300 px or 72 px
- Colour Mode to RGB
Then click Create.
Now for the background, we have to add a gradient.
- Just go to the Layers Panel and click on the Adjustment Layer icon.
- Click on Gradient.
- Select your gradient and then click OK.
This will add a background gradient for us.
Now we have to add some text on that background so go on the text tool and click on our document canvas and type your text like a title. Then we can click on another part of the canvas to add another text and then I am going to add a simple small tagline below the title text.
Then we can drag and drop a logo and place it at top of the document.
If we want to add a gradient to our logo you can do that by just going to Blending Options and Selecting Gradient Overlay.
We can also create a shape whatever you want I’m going to select Ellipse Tool and create two circles on each side of the banner. This will create two more elements in our banner. Then we can add Gradients to it. (It is your choice whether you want to add it or not).

This is how we can make our design by using gradients.
Final Words | How to do Gradients in Photoshop
Now you can use Gradients wherever you want in your design. You don’t have to use gradients in all your design elements.
Just use it where you want.
Let’s wrap up this article, we’ve learned how to do a gradient in Photoshop, how to use the gradient tool to make gradients on our document, how to make your own gradients, and how to save our own custom gradients in Photoshop for later use.

Then we learned how to add gradients on other design elements like text, logos & backgrounds.
I think this article will be helpful for you if you want to master Photoshop.
Happy Designing 🙂
FAQs | How to do Gradients in Photoshop
What is the benefit of the gradient tool in Photoshop?
Using the Gradient tool, you can quickly make subtle alterations to the color and brightness of an image. To make beautiful backgrounds for logo designs, poster art, customized profile photographs, and more, you can utilize several gradient kinds to blend with or overlay other images.
Why do people use gradients?
The progressive blending of one color into another is called a gradient. It almost allows the designer to invent a new color. By giving the design a new dimension and giving the object more realism, it distinguishes objects. Gradients, to put it simply, add depth.
How important is color gradient?
The way a TV handles gradients determines how well it renders shades of similar colors. An image with various color tones can be displayed on a TV with good gradient handling without any banding. Since HDR content displays more colors than non-HDR content, it is crucial to have effective gradient handling.

I’m a Graphic Designer with 5+ years of experience. Specialized in Adobe Photoshop.
Get Info About Any Photoshop Editing, Photoshop Manipulation, Logo Design, Flyers, Business Card, Cartoon Portrait and any type of work-related to Graphic Design and Photoshop Editing.


