Wanted to know how to make a sketch in Photoshop of any picture in the easiest way possible? You are in right place.
We all know that it is the era of technology and digital arts. And we have to make our place in this growing world of technology and graphics.
There is no denying that sketching and creating drawings by hand remain exceptional and wonderful skills. However, we have the technology to make life easier for us.
We are talking about software and applications which are made for us to make our life easy in any field.
Now in the field of designing and art, we know Photoshop is a versatile and excellent software to use.
So let us have a picture of ourselves or a client’s picture which we have to make a sketch to use in different designs, products, or anywhere you want.
The main thing is we need to make a sketch of a picture and we don’t have the skill of hand arts or sketching and we have to know how to make a sketch in Photoshop.
Here Photoshop comes with its techniques by which we can easily convert our pictures into sketches in very simple steps.
We just have to learn these steps and we can change any picture to a realistic sketch in minutes.
So in this article, I’m going to show you how to make a sketch in Photoshop in 7 simple and easy steps.
Let’s Go For It!
Table of Contents
Opening Your Picture in Photoshop
First of all, you have to open the picture on which you need to apply the sketch effect in Photoshop and to do that you just have to Drag & Drop the picture on Photoshop.
Another way is to go to File > Open.

Step 1: Duplicating Layer
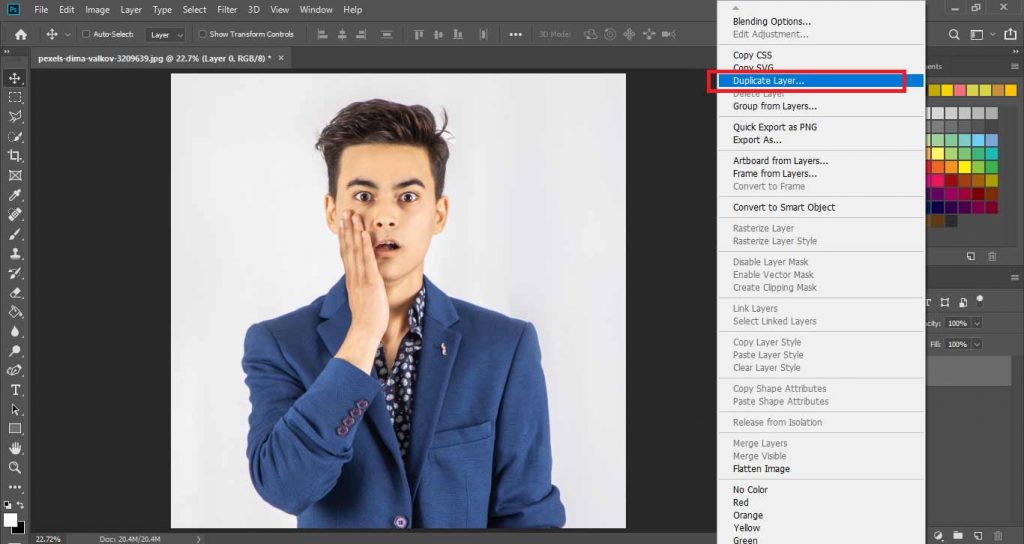
Now you have your picture opened in Photoshop. Press Ctrl + J (For Windows) or Command + J (For Mac) to duplicate your layer in Photoshop.
Another way of doing this is to go to Layers Panel. Right-click on the layer and click on Duplicate Layer to make a duplicate of that layer.

The main reason for duplicating layers is to keep the original layer as the backup to work non-destructively.
Step 2: Inverting the Layer
Now you have your second layer selected and have to work on it.
Making sure your layer is selected press Ctrl + I (For Windows) or Command + I (For Mac) to invert your layer in Photoshop.
You can also go to Image > Adjustments > Invert.

This will look like a scary-looking negative of it.
Step 3: Making Smart Object and Adding Gaussian Blur
After inverting the layer you have to add Gaussian Blur to the inverted layer but before adding that you have to convert the layer to a smart object to make it non-destructive.
In this way, we can increase or decrease our blur effect even after creating the whole image.
So to convert the layer to a smart object, just go to Layers Panel. Right-click on the inverted layer and select Convert to Smart Object.

Now you have your smart object and if you apply any filter on it, you can change its value later.
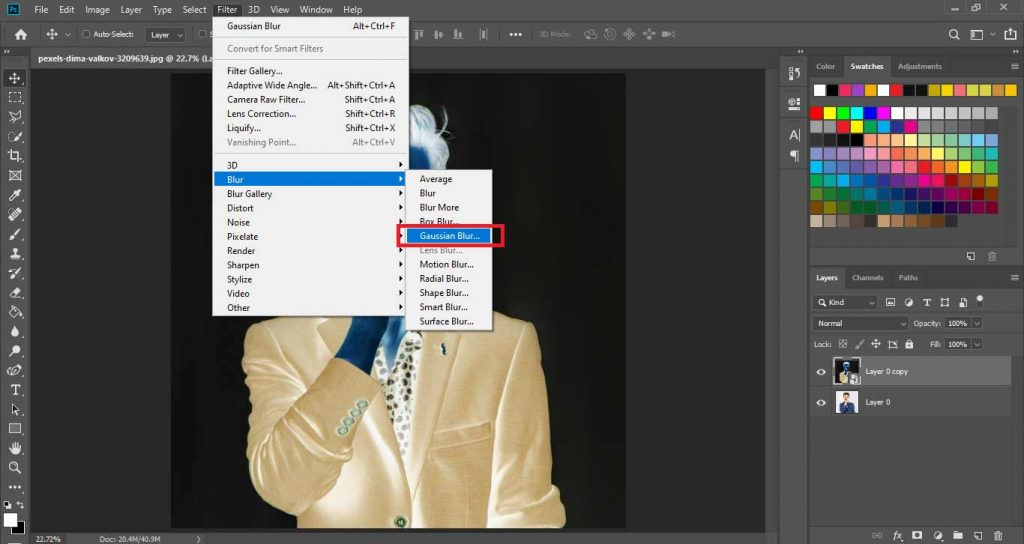
For the sketch effect, you have to add Gaussian Blur to this layer, and to do this go to Filters > Blur > Gaussian Blur.

Set the radius to 40 pixels and press OK.
You can also change this radius later to take a look at which value works you best.
Step 4: Changing Blending Mode
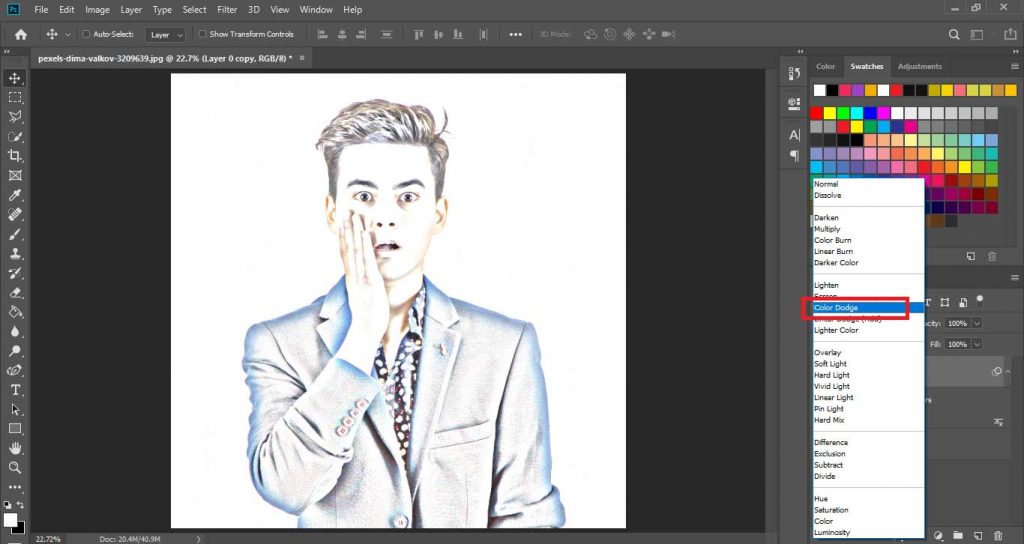
After adding the Gaussian Blur you have to go to the Layers panel and change the layer’s blending mode to Color Dodge.

This will create a crayon-like effect on the picture but you need to add some contrast to it to make it look more realistic.
Step 4: Adding Levels
Now you have your picture started to look like a crayon drawing and you have to add a little contrast to it.
To do that go to Layers Panel and add a Levels Adjustment Layer.

Then go to the properties of Levels and drag the mid-tones and highlights to the right to add some contrast.
You can just change the value of mid-tones to 0.70 and highlights to 50, to add that contrast.

Step 5: Making Image Black & White
You have your crayon-like looking drawing now but we need the sketch effect and to that, we have to convert the picture to black and white to make it look like a real sketch.
To do that you just have to go to Layers Panel and add a Black & White Adjustment Layer to take out all the colors from the picture.

Step 6: Adding Glowing Edge Filter
Now you have your image really looking like a sketch but we have to add some more effect to look it more like the realistic hand-drawn sketch.
In order to do this, we have to add an effect from Filter Gallery to the whole picture, and to do that we have to make a merged layer of all layers.
To make a merged copy of layers visible you just have to press Ctrl + Alt + Shift + E (For Windows) or Command + Option + Shift + E (For Mac).
This will create a merge of all layers and paste them into a new layer.
Now we have to go to Filter > Filter Gallery.

In Filter Gallery go to Stylize > Glowing Edge.
Set Edge Width to its minimum value (1), Edge Brightness to its maximum value (20), and Smoothness to its maximum value (15), and then click OK.

- This makes it black like the picture we just have to invert it as we did before by pressing Ctrl + I (For Windows) or Command + I (For Mac).
- Change its Blending Mode to Multiply.
- And finally, change its Opacity to 50% to 60%.

This will create a realistic hand-drawn sketch effect to the whole picture.
Step 7: Adding Paper Effect
Finally, in the final step, you just have to make a paper effect to the whole picture to make it look like a sketch drawn on paper.
To do that:
Make a new layer by going to Layers Panel and fill the layer with white color using Paint Bucket Tool.

- Then go to Filter > Filter Gallery.
- In Filter Gallery go to Texture > Texturize.
- In Texturize properties, set the texture to Sandstone and click OK.

- Then change the Blending Mode of this layer to Multiply to keep only the texture of that layer.
- Then finally, change its opacity to 60% to 70%.

Related: Learn To Make A Professional Collage Of Your ArtWork In Minutes.
Finally, you have your complete picture converted into a realistic hand-drawn paper sketch and these steps are how to make a sketch in Photoshop.

Watch Related Video:

I’m a Graphic Designer with 5+ years of experience. Specialized in Adobe Photoshop.
Get Info About Any Photoshop Editing, Photoshop Manipulation, Logo Design, Flyers, Business Card, Cartoon Portrait and any type of work-related to Graphic Design and Photoshop Editing.


