We see banner ads and website banners every day, and they are a great addition to your marketing campaign. In this tutorial, I’ll show you how to make a banner in photoshop for printing.
For a banner ad design or template, we need some key elements in the Banner in which we should have an offer and a call to action.
You can add your logo if you’d like, and an image to enhance the message.
If these four things are in your banner and aligned professionally then you are good to go.
The offer we make in the banner should be succinct and direct. The readers of your design must be made aware of the position you are advocating.
The call to action is a text/button that will invite your consumer to your website. Short phrases like “Join Us” or “Subscribe” are great examples of the call to action buttons.
In this tutorial, we’ll know how to make a banner and ads in photoshop for printing and we’ll design a Large Leaderboard size horizontal banner that includes all the essential elements.
Then after learning those techniques, you can apply these techniques to any size of banner you want.
Table of Contents
Master Banner Design in Photoshop
There are the following step by step guide for designing banner using photoshop for increasing quality and client satisfaction.
Let’s Go For It!
Thing You Need
For Banner Ad design, first, you need Adobe Photoshop and then you need some other assets like fonts and pictures of your product or any model related to your banner.
But first and foremost you need to have the strong set-up that supports the quality editing by purchasing the top quality laptops for designing.
To design this specific Banner Ad you need Montserrat Font, you should download its complete family and it is totally free for commercial use.
Download the assets and make sure the font is installed on your system before starting. When you are ready, we’ll get started on creating your banner ad.
Step 1: Setting Up a Banner Design File
In Photoshop, go to File > New. Name the document of your choice. Set the file to the following dimensions:
- Width to 728 px
- Height to 210 px
- Orientation to Landscape
- Resolution to 300 px or 72 px
- Colour Mode to RGB
Then click Create.

This is the actual size of a Large Leaderboard Banner Design.
Step 2: Adding Background
First of all, we have to add a black background to our document.
In this tutorial, I’ll be designing a Gym and Sports related Banner Ad as an example. But these techniques can be applied to any other banner design.
Go to Layers Panel and add a Solid Color Adjustment Layer and take a blackish color. Color Code: 202020.

Step 3: Importing Product or Model
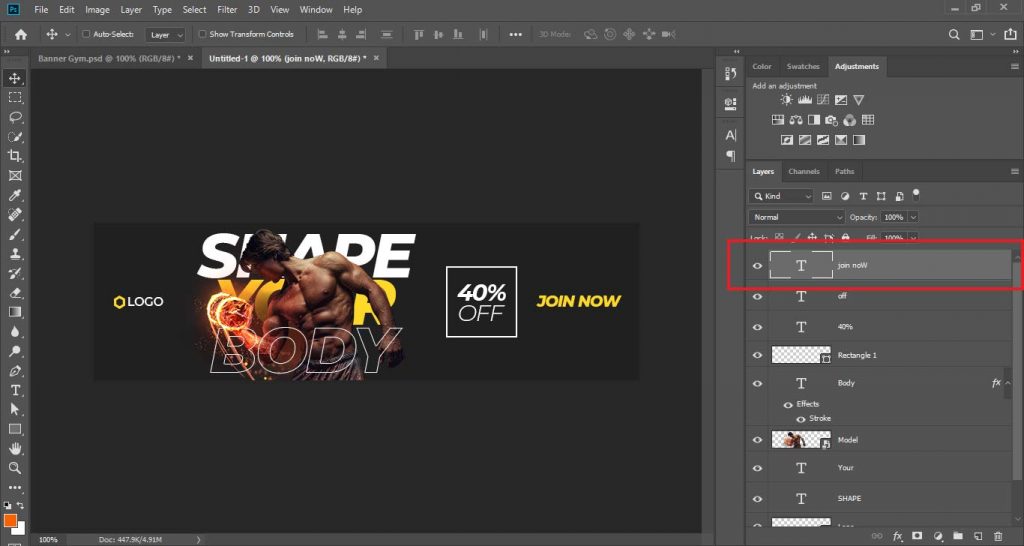
After adding a background like in the sketch designing, we have to add our asset images like in this example, I have a model related to Gym so I’ve imported it and aligned it on the Center-Left of the banner document.
You can import any product you want to showcase in your banner ad, then resize and align it anywhere you want.

Step 4: Adding Logo
Now you can also add the import logo of the company to the document by simply dragging and dropping on onto the canvas, make it small, and align it on the left of the canvas.

Step 5: Adding Main Text
Now we have a background with the model aligned on it. So, we have to add our main text.
For this, just go to the text tool and select the font you want to use. In my case, I’ll use Montserrat ExtraBold Italic and make sure that the color is white.
Now write the main text in three separate layers like I did SHAPE in one layer, “YOUR” in the other layer, and then “BODY” in the third layer.
To make the banner look more catchy and professional, take a color from the logo and set the 2nd text color to that color.
Now align them upside down as I did in the picture.

Then you have to select the first two text layers from Layers Panel and take them below the model or product layer to give it a stylish look.
Now our first two lines of text are below the model and the third text layer is above the Model layer.

After that, we have to make our third text only stroke.
To do that right-click on the “BODY” Layer and select Blending Options.

In blending options, select Stroke and set its color to white and size to 1, and click OK.

Now in the layers panel, change the Fill of the “BODY” layer to 0% to make the only stroke visible.

We have our main text ready!
Step 6: Adding Offer
After that, we have to add another essential element of the banner and that is adding an Offer to attract people.
For this specific design, you have to add a stroked box and add your offer inside it.
To do that, select Rectangle Tool.
In the settings of Rectangle Tool, set it to Shape, set Fill to None, Stroke to White color, and Stroke size to 2 pixels.

Left-click on the canvas and set the Width to 95 pixels, Height to 95 pixels, and click OK.
Align the square on the right side of the main text.
Now add text of offer by selecting Text Tool and set font to Montserrat ExtraLight.
Type 40% OFF in two lines, resize, and align them inside the stroked box.

So we have our Offer ready!
Step 7: Adding Call To Action
We have all essential elements of Banner except Call to Action.
For the call to action, the button takes color from your company logo and type the text of that.
To add a call to action text, select the text tool, set Font to Montserrat Bold, set the font size to about 22 pixels, and Type JOIN NOW.
Align the call to action on the right side of the banner.

This is how to make a banner in photoshop for printing with all essentials banner elements. Finally, we have all the essential elements in our banner!
Step 8: Extra Adjustments
We have our banner ad ready to use but to make it more catchy and professional, we have to add a light behind the model and main text to make it pop.
For this specific design, I am going to use an orange color which I took from the model image. And also orange represents energy and speed so it fits in this banner.
Make a new layer below all layers and above the background layers.
Select Brush Tool and take a Soft Round Brush. With the size of 350 px to 400 px, paint a dot beneath the model on the new layer.

This will give an elegant and energetic look to the whole design.
Also Check our best laptop pick in 2024 for you that enhance the quality of your work and add five stars on your profile.
Conclusion: How to Create a Banner in Adobe Photoshop?
So we’ve learned how to make a banner in photoshop for printing in simple steps. You just have to follow the main steps and you can make any design of banner on any size.
Frequently Asked Questions
By following the above steps including set-up banner design file, add background, and more you can easily create a top quality and best banner for your business or clients.
Select a template. Check out Canva’s extensive selection of banner templates in a variety of designs and themes to suit your needs.
Create a personalised banner in just a few minutes.
Use your imagination when creating design elements.
Download and distribute.
In the above discussion we share an easily step by step guide with you from adding the design banner photo at the end of the perfect banner design, you can check that and make your work best quality.
Decide on appropriate units, such as pixels or inches, for the banner’s measurements. To produce clean and crisp images for printing, the usual resolution is 300 pixels per inch (PPI).

I’m a Graphic Designer with 5+ years of experience. Specialized in Adobe Photoshop.
Get Info About Any Photoshop Editing, Photoshop Manipulation, Logo Design, Flyers, Business Card, Cartoon Portrait and any type of work-related to Graphic Design and Photoshop Editing.


