
We used to cut out images from papers or magazines when we were a child but now we are going to do this in Photoshop. It’ll be fun as well as learning so in this article You’ll learn how to cut out an image in Photoshop which is obviously more precise than in childhood.
One of the most interesting uses of this tool is cutting off images or subjects to make photo-composites.
There are numerous uses for a cut-out image. Adobe Photoshop offers a multitude of tools and techniques for cropping an image and removing the background due to the many varied uses and purposes.
I’ll show you how to cut out an image in Photoshop using three different approaches in this tutorial. We have two methods to select a subject and then one method to refine any selection to keep it precise and realistic.
Learn to match the subject with your background to make awesome composites.
Table of Contents
3 Methods for Background Removal in Photoshop
Let’s begin by stating that an effective cut-out requires careful and precise selection. Things will never integrate realistically if you don’t do this.
Of course, you could remove an image’s background to achieve the paste-on-top look on purpose. However, you should proceed in a controlled way and avoid carelessness.
So, the approaches I’ll show you are various strategies for selecting the subject to cut out and you’ll learn how to cut out an image in photoshop. The background can then be removed or replaced, multiplied, subject transferred to another photo for a Photoshop collage or anything else you can imagine.
Method 1: Quick Selection Tool In Photoshop
This tool is built on a brush that you will use to ‘paint’ the region that you want to choose – there are Photoshop plugins that can helped with this, but the integrated tool has improved to the point where they are no longer essential with the current versions.
The great thing about this brush is that you can just make broad strokes and it will detect the edges of the region for you, allowing you to make more accurate selections.
As a result, when you have large blocks that are clearly separated by hue, contrast, or focus, this is the technique to use.
Now let’s check how to cut out an image with the Quick Selection Tool
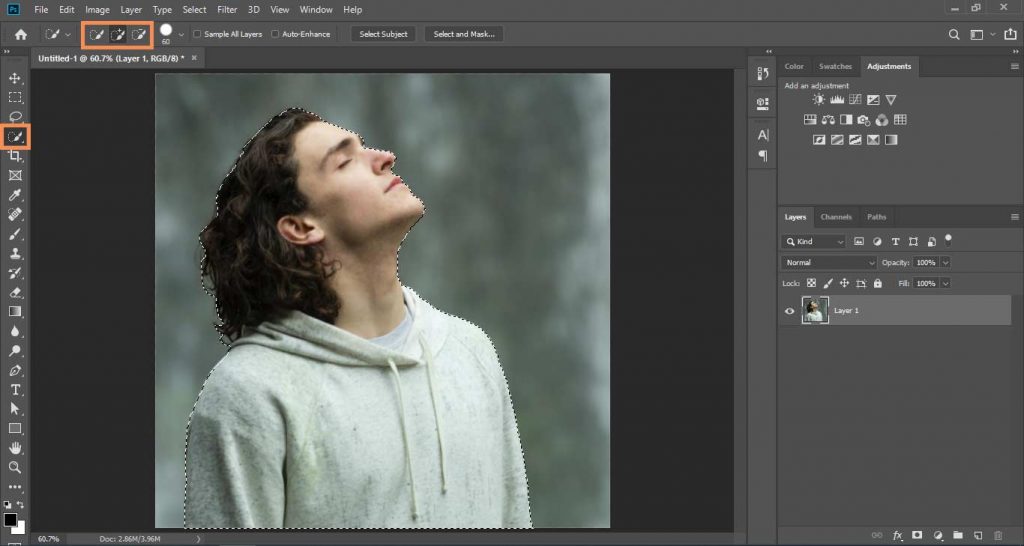
Step 1: Selecting Quick Selection Tool
To begin, locate the Object Selection tool in the Tools panel on the left side of your screen. To open the toolset, click and hold on it, then select the Quick Selection brush from the menu.
If Quick Selection was already enabled in the toolset, you may use the keyboard shortcut W to use it.
Step 2: Painting On Subject
Now you must choose the size of your brush based on the area that has to be selected. You risk going over the edges and selecting something you don’t need if the brush size is too big.
Then all you have to do is click, drag and paint on the subject. It’ll automatically start to select the subject. For example, I just dragged the brush around the apple and the brush automatically found the edges and covered the entire blue background.
Step 3: Fin-Tune Selection
All you have to do now is zoom in and double-check your selection. By switching between the Add and Subtract modes on the Options bar at the top, you can add or delete areas.
Simply click and drag the brush in the region that needs to be fine-tuned once you’re in the suitable mode of Addition or Subtraction.
Step 4: Cut Out Your Subject
Use a Layer Mask if you only want to remove background but want to operate non-destructively. This way, you’ll always have the option of making changes later.
For this click on the Layer Mask button on the bottom of the layer panel.
Learn About Masking Layers In Photoshop.

Method 2: Color Range
As the name implies, this Photoshop background removal method is focused on color. All you have to do now is sample the color you wish to be selected.
When you have disconnected regions and minor details in the same color, this is a good technique to apply. Let me use an example to demonstrate what I mean.
Step 1: Select Color Range
Select Color Range from the menu Select, when your image is open in Photoshop. This will bring up a dialogue window where you can customize your selection’s parameters.
Step 2: Select Color
Make sure the Sampled Color option on the menu is selected.
Then, with the first eyedropper, select the color you’d like to use. It’s fine if you don’t notice a difference right away. You’ll do this with the sliders.
Step 3: Adjust the Selection of Color
The first slider, Fuzziness, should be used. Start sliding it to the right by clicking on it and dragging it carefully.
More variants of the color you choose will be included in the choices as the value rises.
So, keep dragging it until the thing you want to cut off is completely black, but stop before other elements emerge. From image to image, the correct value will change.
By the way, if it’s more convenient for you, you can change the view mode from Selection to Image. For me, the black and white view is the finest.
When you’re satisfied, click OK.

Step 4: Refine And Cut Out The Selection
As you can see, using this method can save you a lot of time and effort compared to using other techniques to cut out an image.
The disadvantage is that getting it correctly generally requires some fine-tuning. This is dependent on how many colour changes there are in your image.
Any tool can be used to fine-tune. For this, you’ll find the Select and Mask method I outlined next to be very effective.

Method 3: Select and Mask In Photoshop
As a successor for the Refine Edge tool, the Select and Mask tool was created. You won’t be able to find it if you’re using Adobe Photoshop CS6. It’s more of a tool than a workspace.
As a result, you can use it as a stand-alone tool or as a supplement to another tool to complete the selection process.
I’ll demonstrate how to utilize it to fine-tune a previously made selection. If you want to do everything with it, go to the menu Selection, Select and Mask and open it.
Step 1: Make The Selection
A simple selection can be made with any tool that you are familiar with. Consider the Quick Selection tool described in the previous method.
Subject Selection will work nicely for my image, but you can use any lasso tool you like, such as the Magnetic Lasso or the Polygonal Lasso.
Step 2: Open Select & Mask
Select and Mask can be used if your selection looks fine but needs some improvement. This can come in handy when choosing hair or fur, for example.
Click the Select and Mask button in the top bar to open the task space. The Select and Mask button is shown regardless of the tool you used to make your selection. You can also access it through the Selection menu.
This will launch the workspace of Select and Mask.

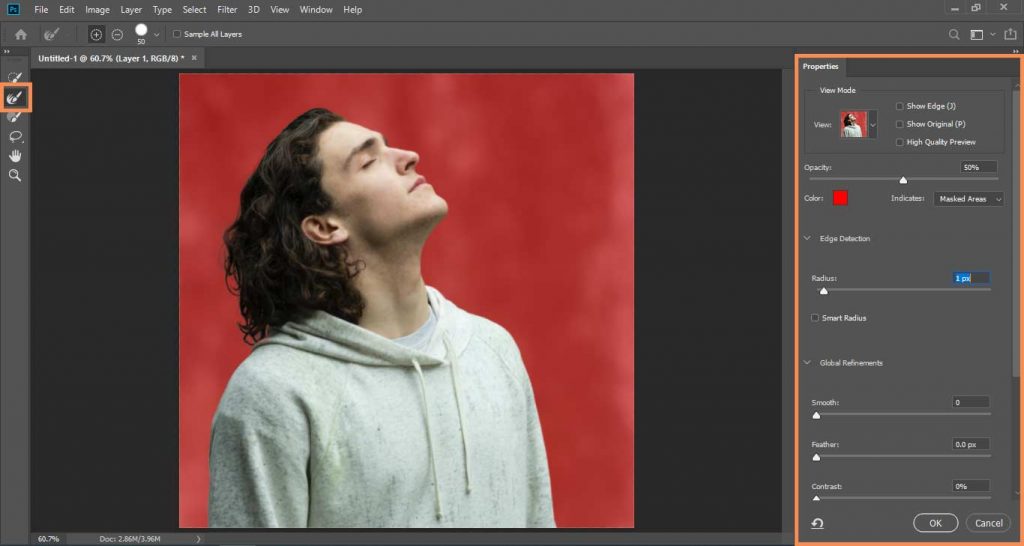
Step 3: Choose working background in Select And Mask
This workspace allows the user to select the way you see your image before you start adjusting your choices to make your work easier.
The Properties panel is located on the right-hand side. The View Mode is located at the top. This will allow you to alter the background opacity, make your selection black on a white background, and a variety of other settings.
Choose the one that gives you the best view of the details. Depending on the area you’re working on, you can adjust this as many times as necessary.
Step 4: Refine Edges
The tools panel is located on the left side of the screen. You can select the tool you want to use from this menu.
Choose the Refine Edge Brush Tool if you’re working with hair or fur, like I am. Decide on the size and begin painting on the edge that has to be corrected.
Step 5: Fin-tune And Cut Out Subject
To fine-tune the selection, use the sliders on the Properties panel, such as Radius or Feather.
Then zoom out and take a look at the whole picture. You can utilise any of the tools in the left panel, such as the Quick Selection tool, if you identify something else that needs to be fixed.
Simply click OK when you’re finished to dismiss the Select and Mask workspace and create a new Layer with a Mask to cut out your image.
(If you want to change the color of an object, see this guide.)
If you wish to work non-destructively, add a mask to the selection, or erase the background if you’re confident you won’t need it.
Conclusion | How to Cut Out an Image in Photoshop
That is all there is how to cut out an image in photoshop. As you can see, there are a variety of ways to clip out an image with Photoshop. To get the job done, you’ll almost always need to use a combination of tools.
Simply ensure that your selection is as precise as possible if you want to remove the background. This will give you the best cut out image possible.
I hope you enjoyed this tutorial and will be able to utilise it in your future creative projects.

I’m a Graphic Designer with 5+ years of experience. Specialized in Adobe Photoshop.
Get Info About Any Photoshop Editing, Photoshop Manipulation, Logo Design, Flyers, Business Card, Cartoon Portrait and any type of work-related to Graphic Design and Photoshop Editing.


