
The color components that make up the visuals you see on the screen are referred to as channels in Photoshop. The RGB color profile of a picture is made up of the image’s standard channels. To make certain activities easier, you can create a new channel called an alpha channel. So, what exactly are alpha channels, how to create Alpha Channel Photoshop and how do you make use of them?
In addition to the RGB color channels, Photoshop now creates an alpha channel that enables you to save the transparency settings for an image or selection. Alpha channels are used to store selections for later use or to share selection data between editing programs.
By simplifying the selection process, learning how to work with alpha channels can improve your workflow. You can use selections to isolate parts of your image or modify the opacity of specific sections. Using an alpha channel to save your selections for later usage is a great method to save time.
This is especially useful when working on a project that requires you to make difficult choices. So let’s get started on learning everything there is to know about creating alpha channel photoshop.
Table of Contents
What Is An Alpha Channel?
An alpha channel is a layer on top of a picture that allows you to alter specific areas without impacting the remainder of the image. It enables you to quickly generate translucent sections and preserve a selection for later usage.
How does An Alpha Channel Work?
Simply defined, an alpha channel is a form of a mask that makes it much easier to alter your photographs. To comprehend how an alpha channel functions, you must first comprehend what ordinary channels are and how they operate on an image.
By default, any image you modify in Photoshop has three channels. RGB is made up of three channels: red, green, and blue. You’ll be able to see how much of each color is in the image when you choose these channels.
You can also add a new channel, known as an alpha channel, to the image to allow for more creative editing. An alpha channel can be used for changing the opacity of some of your image’s parts, creating a transparent background by isolating pieces of the image, or making a note of difficult choices to use later.
Advantages of Using Alpha Channel
The biggest advantage of using an alpha channel is that it allows you to construct transparent sections that may be transferred to other programs that support them. If you need to isolate an object in an image for usage in other programs, such as video editing software, this is a useful feature.
You can store your choices as an alpha channel once you’ve finished it. The alpha channel will be picked up when you move the image to another software, allowing you to continue working with the selection.
Are Layer Masks and Alpha Channels are same?
While an alpha channel is similar to a layer mask in terms of functionality, it also offers you a persistent selection that you may access later.
Even though you can simply build a selection and maintain it in your layer mask, merging or deleting your mask may cause you to lose it.
Within the software, an alpha channel is saved. You may either retrieve it if you need it later or delete it once you’ve finished with it.
Advantage of Layer Masks
Layer masks are advantageous since they are a non-destructive style of editing that allows you to keep the original pixels in the event of any errors. Alpha channels allow you to preserve these selections for non-destructive modification later.
Finally, the layer mask is linked to the layer it is applied to and becomes the layer’s alpha channel. An alpha channel is a separate selection that resides in your workspace, separate from any layers.
Related: Learn All About Layers Masks in Photoshop and How to use them to work non-destructively.
How to create Alpha Channel Photoshop and How to Edit it
It’s not difficult to make an alpha channel in Photoshop. However, it opens up a slew of additional editing possibilities, allowing you to take your editing talents to the next level.
In this example, you may utilize an alpha channel to separate an item from the background, allowing you to reuse the object on different backgrounds for several projects.
How to Create Alpha Channel Photoshop
Navigate to the Channels panel, which is placed next to your layers, to create an entirely new alpha channel. If you don’t see this option, go to Window > Channels to see it.
Select New Channel from the drop-down menu at the upper right of the Channels screen. On the pop-up window, give the channel a name.

The brush tool can then be used by selecting it from your toolbar or pressing B on your keyboard. By subtracting from the alpha channel, you can draw areas that you’d like to pick.
Then, at the bottom of the Channels window, select “Save selection as channel” to create a selection from your marks. You can then use any of the Adjustment tools to alter the selected region as needed.
The alpha channel will appear as a crimson overlay with a 50% opacity. The Brush tool removes sections of the overlay to illustrate where your selection is as you use it.

Using A Selection To Create Alpha Channel Photoshop
Start by selecting your object to make a selection and then an alpha channel. Any selecting tool can be used for this. I’ll utilize the Quick Selection tool in this example, which can be accessed by pressing W on the keyboard.
Hold down the Quick Selection icon until a new menu appears, allowing you to select a different selection tool.

Next, make a selection around the object you want to isolate. The dotted lines will show you what you’ve chosen.
If necessary, you can refine your choices by selecting “Select and Mask” from the top options bar. This allows you to feather your choices or smooth the edges. However, once the alpha channel has been produced, we can further tweak this.
Saving Selections
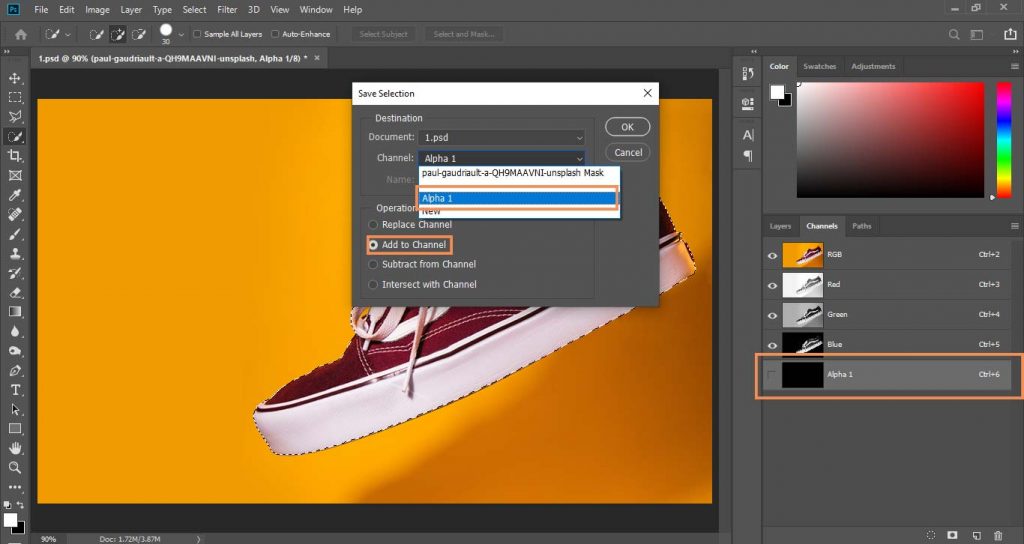
The alpha channel can be created in two ways. The first is to save your image by right-clicking on it and selecting “Save Selection.” A window will appear, allowing you to name your new channel.
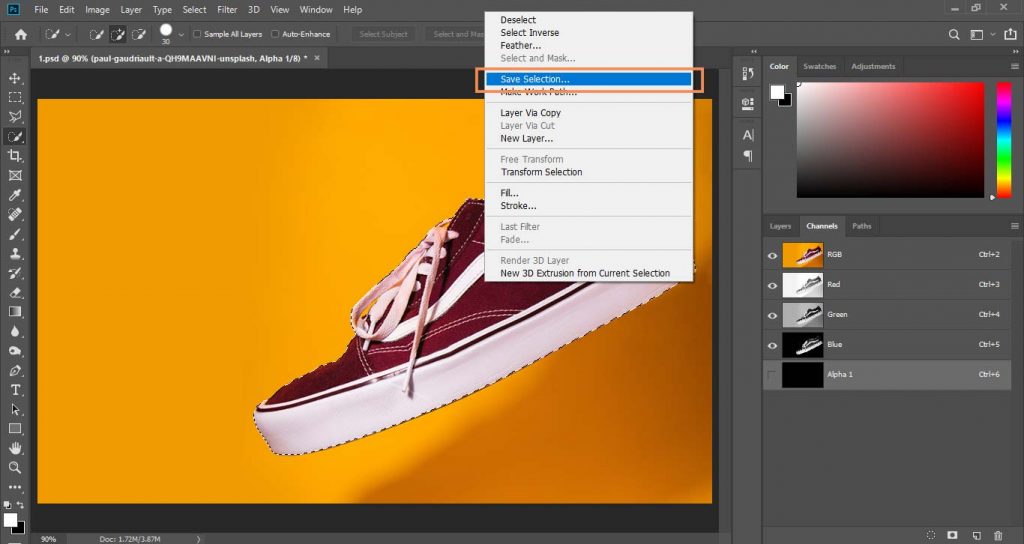
If you want to store the alpha channel in a new document, this method is useful as long as the pixels in both documents are the same.
If you want to add a new selection to an alpha channel that you’ve already established, this method is also beneficial. When the window pops up, click the dropdown menu next to “Channel,” select the channel, and then choose the “Add to Channel” option in the bottom area.
The alternative option is to go to your Channels panel on the right-hand side of your workspace and add your channel there. The layer panel is immediately next to this choice. Click “Save selection as channel” at the bottom.
Based on your choices, an alpha channel will be created automatically. To deselect the object, use Control + D (Windows) or Command + D (Mac) on your keyboard.
Changing the Alpha Channel
You can change your alpha channel to create a more exact selection if you want to refine your selection.
Toggle the eye symbol next to the channel to make sure your Alpha Channel is selected. You can switch off the other channels in the workspace to see only your alpha channel.
To pick the brush tool, hit B on your keyboard. You can either add or delete from your selection by using white and black colors.
Note:
White: This area can be edited and will be added to the selection.
Black: Takes away from the selection and protects it from editing.
When adding or deleting elements of your selection, you can also modify the opacity on the top choices bar.
After you’ve created your new alpha channel, you may use it to make a selection, use it as a layer mask to edit certain areas, and utilize it in other programs that support it. To load a channel, simply click “Load channel as a selection” at the bottom of the Channels screen.
It’s worth noting that alpha channels can only be saved in PSD, PDF, TIFF, or PSB formats. Because JPEG and PNG are compressed representations of the file, they do not save the alpha channel data.
How to Create Transparency Alpha Channels
You may build an alpha channel using two approaches if your image already has a transparent backdrop.
Create a selection by clicking on the layer in the layers panel that contains the object while holding down the Control (Windows), Command (Mac) keys (Mac). This will select the whole object.
Then go to the Channels panel and select “Save selection as channel” from the drop-down menu. This will establish your alpha channel, which you can later alter or transfer to other apps.
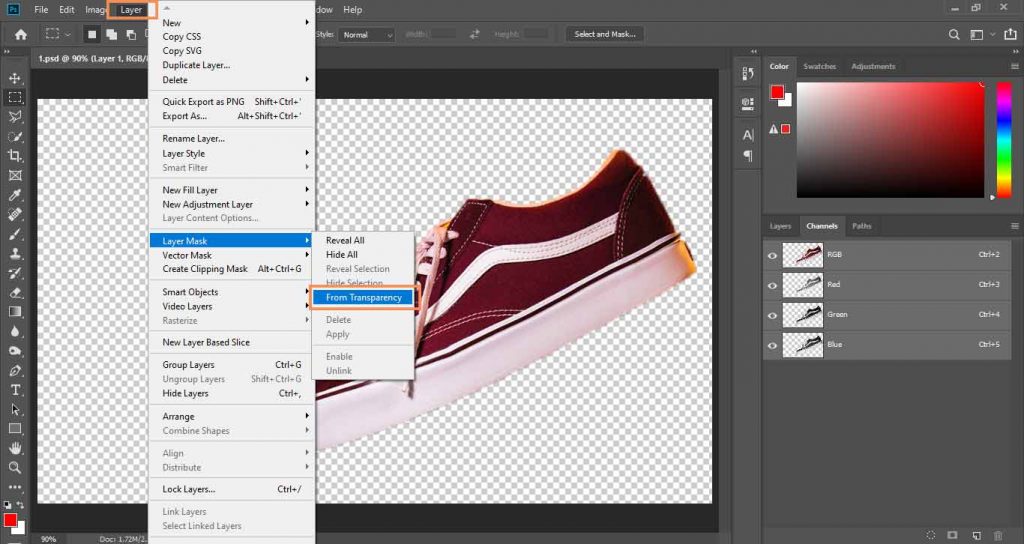
To use the second approach, make sure you’ve selected the layer from which you want to create an alpha channel.
Then go to Layer > Layer Mask > From Transparency. This will build a mask on your layer that contains the non-transparent objects automatically. It will also appear as a distinct channel in the Channels panel.
If you opt to eliminate the layer mask, you can “Load channel as a selection” at the bottom of the Channels panel and “Save selection as channel” to create a distinct alpha channel.
How to Delete Alpha Channel Photoshop
To delete an alpha channel in Photoshop, go to Window > Channels and select the Channels tab. Right-click the alpha channel you want to delete and pick the deleted channel from the menu. The alpha channel will be permanently deleted, along with any selection information saved to it.

Alpha channels increase the size of your files, slowing down your process and saving speed. While a document can have up to 24 alpha channels, it is not a good idea to preserve alpha channels when you won’t be using them.
You should delete an alpha channel when you’re done with it and won’t be working on it again in the future to make your document as short as feasible.
Navigate to the Channels panel to delete an alpha channel. Then pick “Delete Channel” from the right-click menu on the alpha channel you no longer require.

Conclusion | Alpha Channel Photoshop
We’ve learned all about the alpha channel and now we can use it in any project. The main thing we have to learn is the concept of any work and we learn that we can use that concept in any of our projects accordingly.
Hope you’ve learned some great things about the alpha channel and if you have any queries about anything or you want an article about Graphics designing just comment that below.
Happy Learning!

I’m a Graphic Designer with 5+ years of experience. Specialized in Adobe Photoshop.
Get Info About Any Photoshop Editing, Photoshop Manipulation, Logo Design, Flyers, Business Card, Cartoon Portrait and any type of work-related to Graphic Design and Photoshop Editing.


