Wanna learn How To Fix the Pixelated Logo In Photoshop? Landed in the right place.
If you have a grainy and blurry logo as a result of zooming in your logos. This is called pixelation, and this is what happens when you stretch out your photos so much or try to resize them.
Pixelation is a thing that represents the bitmap region, i.e., small colored squares in large size pixels. When a logo becomes grainy or blurry with a low resolution, we give a term to it as pixelated images.
In this tutorial, we will learn how to fix a Pixelated logo in photoshop and I also show you how to fix a pixelated image in online tools.
Let’s Go For It!
Table of Contents
Fix Pixelated Logo In Photoshop
Photoshop is the software that just takes seconds to adjust the pixelated images and logo and provides you with a new, bright, and vibrant copy that carries an excellent outlook.
However, this software can do so much to your photos that the cost will definitely be worth it. But it can fix many issues with pictures in seconds.
Method # 1:
Open your logo image in Photoshop.
Go to Filter > Blur > Gaussian Blur and use the slider to find an acceptable level.
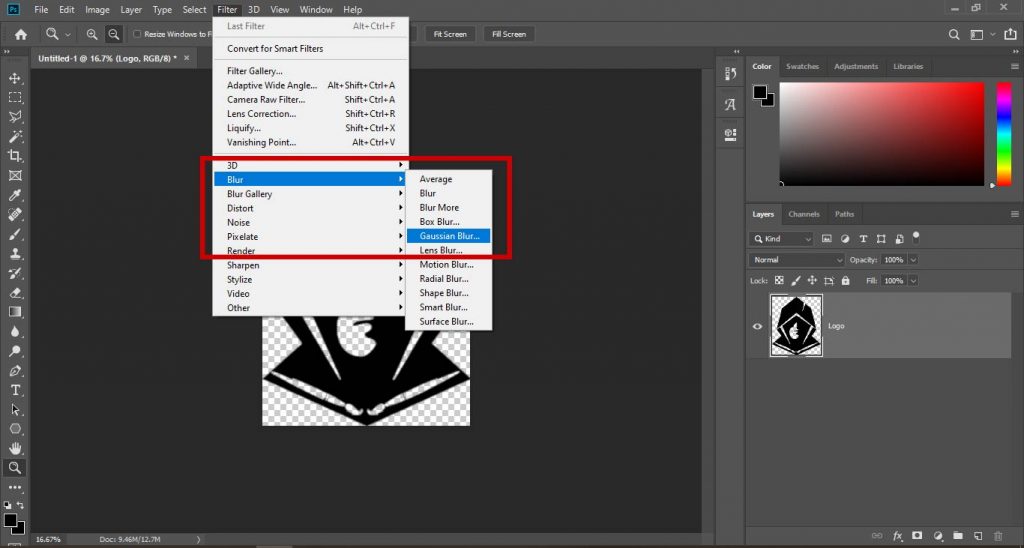
Then Select OK.
Now go to Filter > Sharpen > UnSharp Mask.

Now use the slider to find a level that will work best for your specific logo. For my logo, the Amount works best when it is on maximum but it can vary accordingly and this is the step where your logo’s pixelation is removed and after that, you can also do some additional retouching.

Then Select OK once done.
Now you can export this logo.
Method # 2:
Another approach is to add a layer with soft light to minimize the appearance of the pixels.
After importing the logo in a Photoshop document you have to go to Layers Panel and Create A Duplicate Layer of the logo layer.
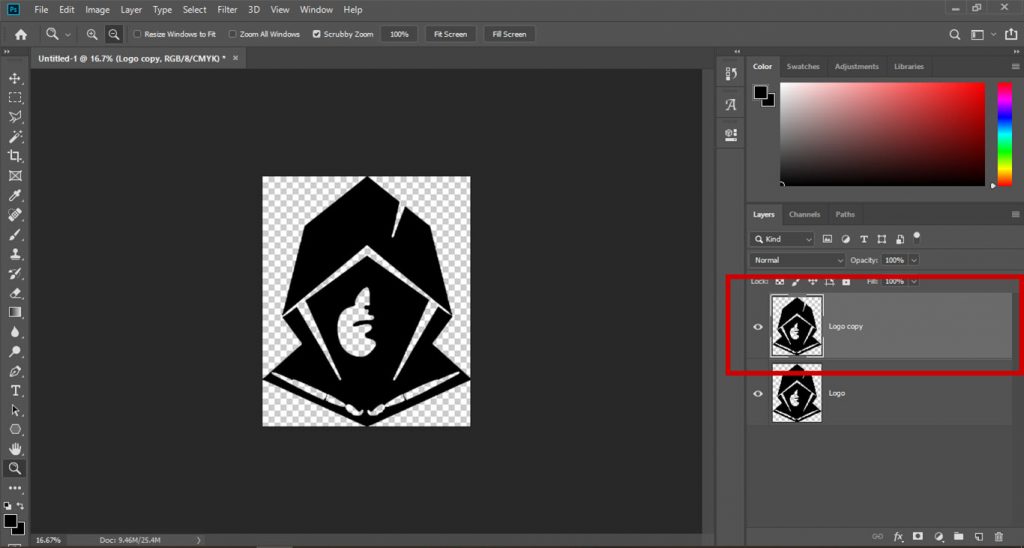
Now make sure that the new layer is highlighted. Select Blending Options in the top menu and select Soft Light.

After applying blending options. Go to Select Filter > Noise > Despeckle.

Now go to Image > Adjustments > Brightness/Contrast.

Adjust both Brightness and Contrast to find a level of your preference and save the image in high quality Jpeg format. This step is optional it is only for giving the final result a final touch.
You can also combine these methods to get better results as results vary from image to image.
The first process will do a bit to minimize pixelation like in the case pixelated text and that may be enough.
If it isn’t, try the next process as this can help a bit too and also think about changing the laptop if the best option is available and on the best discount then why not check it just hurry up before the deal is over.
Fix Pixelated Images With Online Tool
Online tools have the advantage of allowing you to do significant work without having to download any software to your computer.
There are many online tools that can do image editing and manipulation that will make blurry logo clear and turn it from low quality logo to high quality logo.
I know of two good ones for fixing pixelated pictures and will describe them here: Pixenate and Fotor. Both sites offer a range of free tools that you can use to manipulate images without having to download a specific program.
Method # 1: Fotor
- Upload your logo image to the site.
- Now Go to Effect from the left menu and select Pixellate.
Use the scroll bar to scroll left to minimize pixelation.
That should smooth out pixelation nicely.
If you want to try out the tool, select Beauty from the left menu and Smoothing then use the sliders to minimize the pixels.
Method # 2: Pixenate
- Upload your image to the site.
- Go to the Smooth Photo option from the left menu.
The impact this has on the image depends on the initial image quality but should improve it somewhat.
Check Best Laptop for graphic designing that will boost your revenue and increase the quality of your work and save your precious time.
How to Sharpen Logo in Photoshop?
Here’s a step-by-step guide on how to sharpen a logo in Photoshop:
Step 1: Open Your Logo in Photoshop
- Launch Adobe Photoshop and open the file containing your logo.
Step 2: Duplicate the Layer
- In the Layers panel, right-click on the layer containing your logo and select “Duplicate Layer.” This ensures you have a backup in case anything goes wrong.
Step 3: Select the Duplicate Layer
- Click on the duplicated layer to select it.
Step 4: Apply Unsharp Mask Filter
- Go to the top menu and select “Filter” > “Sharpen” > “Unsharp Mask.”
- This will open the Unsharp Mask dialog box.
Step 5: Adjust the Settings
- In the Unsharp Mask dialog box, you’ll see three sliders: Amount, Radius, and Threshold.
- Amount: This controls the intensity of the sharpening. Start with a low value and gradually increase until you achieve the desired sharpness.
- Radius: Adjusts the size of the details that the filter considers for sharpening. A higher radius value targets larger details.
- Threshold: Determines how different the pixels’ intensity must be before they are sharpened. A higher threshold may prevent subtle details from being sharpened.
Step 6: Preview and Fine-Tune
- Check the “Preview” box to see the changes in real-time.
- Move the sliders and observe the preview to fine-tune the sharpening effect until you’re satisfied with the result.
Step 7: Click OK
- Once you are happy with the sharpening settings, click the “OK” button to apply the filter.
Step 8: Compare Before and After
- Toggle the visibility of the duplicated layer on and off to compare the sharpened version with the original. You can do this by clicking the eye icon next to the layer in the Layers panel.
Step 9: Save Your Work
- After achieving the desired sharpness, save your file by going to “File” > “Save” or “File” > “Save As.”
That’s it! You have successfully sharpened your logo in Photoshop.
Conclusion: Make Blurry Logo Clear in Photoshop
By using these techniques, we can eliminate pixelation, but the results are not as precise as you might like given the resolution at the time the logo was made. Nevertheless, resolution can be improved using these techniques.
Frequently Asked Questions
To remove pixelation from a logo in Photoshop, use the “Unsharp Mask” filter. Duplicate the layer, apply the filter with careful adjustments to Amount, Radius, and Threshold. Preview changes, fine-tune, and save for a crisp, clear logo.
You can easily fix the pixelation in logo by implementing the above guide in just 2 to 3 mints easily but if the above method is not work then you can go with the online tools like Foter.
Make a high-quality version of a low-quality logo using scalable vector graphics program, such as Adobe Illustrator. As a result, you can resize without sacrificing clarity. Get the best results by playing about with the colors, adjusting the details, and saving in a high-resolution format.
Make sure Photoshop is open before you open your company’s logo.
Press Ctrl + J to make a copy of the background layer. You absolutely must be on the first tier.
After that, select High Pass from the filter menu. With a greater value, your logo will look sharper.

I’m a Graphic Designer with 5+ years of experience. Specialized in Adobe Photoshop.
Get Info About Any Photoshop Editing, Photoshop Manipulation, Logo Design, Flyers, Business Card, Cartoon Portrait and any type of work-related to Graphic Design and Photoshop Editing.


Op blog
💖
681797 694858I gotta favorite this web site it seems really beneficial . 28016
Thank You For FeedBack❤
655686 392786I dugg some of you post as I thought they were extremely beneficial invaluable 480581
TYSM For FeedBack❤✨
914515 225279Hello there! Good post! Please inform us when all could see a follow up! 919658
Thnkx
470503 141112This is really intriguing, Ill take a look at your other posts! 989624
TYSM❤ Hope It’ll help U 👍
682463 170266Aw, this was a genuinely nice post. In thought I would like to place in writing in this way moreover – taking time and actual effort to create a really great article but what / items I say I procrastinate alot and also no indicates apparently get something done. 146355
Thanks For The FeedBack…I’ll try More❤✨
659310 213434Hello there! Excellent post! Please inform us when I will see a follow up! 697054
Thanks❤✨
305814 145065Spot lets start work on this write-up, I actually believe this amazing web site requirements significantly a lot more consideration. Ill apt to be once once again to read a great deal a lot more, many thanks for that info. 489389
Thanks For The Feedback❤✨
767962 910064I see that you are making use of WordPress on your blog, wordpress will be the greatest. :~- 718849
Thanks For The Feedback❤✨
145516 637406I believe you did an awesome job explaining it. Certain beats having to research it on my own. Thanks 518424
TYSM❤✨
It’s very trouble-free to find out any matter on net as compared to textbooks, as
I found this post at this website.
Thank You So Much For Your Kind Feedback❤✨
I think that is one of the so much important information for me.
And i’m glad studying your article. But should commentary on few basic issues, The web
site style is perfect, the articles is in point of fact excellent :
D. Good job, cheers
ThankYou So Much For Your Kind Response❤✨…We’ll try our best to give you the best information✨
Right here is the right website for everyone who wants to find out about this
topic. You know so much its almost tough to argue
with you (not that I personally will need to…HaHa).
You definitely put a fresh spin on a topic that’s been discussed
for decades. Wonderful stuff, just wonderful!