
Wanted to know how to change hair color in Photoshop of any portrait in the easiest way possible in just 2 minutes? You are in right place.
We all know that it is the era of technology and digital graphics. And we have to make our place in this growing world of technology and graphics.
We are talking about software and applications which are made for us to make our life easy in any field.
Now in the field of designing and art, we know Photoshop is a versatile and excellent software to use.
So let us have a picture of ourselves or a client’s picture which we have to change hair color to use in different designs, products, or anywhere you want.
The main thing is we need to change the hair color of a model and we don’t have that model available again and again to color her/his hair and take pictures.
Here Photoshop comes with its techniques by which we can easily change the hair color of the model in very simple steps.
We just have to learn these steps and we can change hair color in a realistic way in minutes.
So in this article, I’m going to show you how to change hair color in Photoshop in 5 simple and easy steps.
So, Let’s Go For It!
Table of Contents
Opening Your Picture in Photoshop
First of all, you have to open the picture of which you need to change hair color in Photoshop and to do that you just have to Drag & Drop the picture on Photoshop.
Another way is to go to File > Open.

Duplicating The Layer
The next thing we have to do is to make a duplicate of our layer so that we can use it as a backup.
Press Ctrl + J (For Windows) or Command + J (For Mac) to duplicate your layer in Photoshop.
Another way of doing this is to go to Layers Panel.
Right-click on the layer and click on Duplicate Layer to make a duplicate of that layer.
The main reason for duplicating layers is to keep the original layer as a backup to work non-destructively.

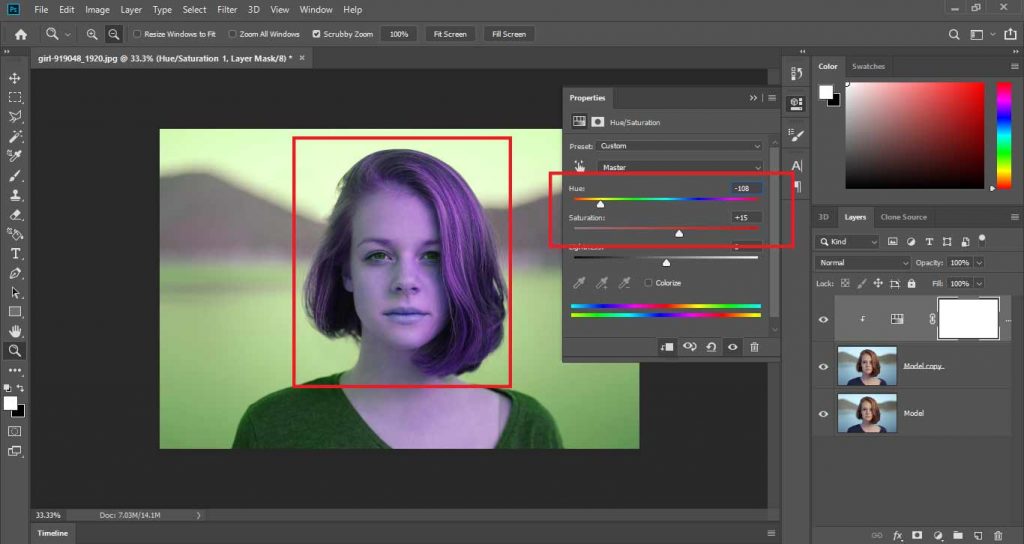
Adding Hue & Saturation Adjustment Layer
After duplicating the layer we have to change the color which means we have to change Hue of the picture.
For this go to Layers Panel and add a Hue & Saturation Adjustment Layer.

And to make the effect only visible to the below layer we have to make it a clipping mask.
To do so right-click on the Adjustment Layer and select Create Clipping Mask.
Now go to the properties of Adjustment Layer and set Saturation to about +10 to +15.
This gives more color to the original hair so that the change of color will be realistic and catchy.
After that, we have to change the Hue to our favorite color (to that color of which we want our hair to be).
You can play with the Hue slider to change color.
Don’t worry that this is affecting the complete picture, just focus on the hair color that you want them to be.
Inverting The Mask
Now we have to invert the mask of the Adjustment layer.
Click on the white mask on the right side of the Adjustment layer.
Make sure your layer mask is selected Press Ctrl + I (For Windows) or Command + I (For Mac) to invert your layer mask.
This will erase all the Hue and Saturation changes from the picture.

Masking
Now all the mask is converted to black and we have to make that effect visible to only hair areas.
So, the color change will only affect hair.
To do that select Brush Tool and make sure your Foreground color is set to White.
In the settings of Brush Tool, take the Opacity to 100% and Flow to 60%.
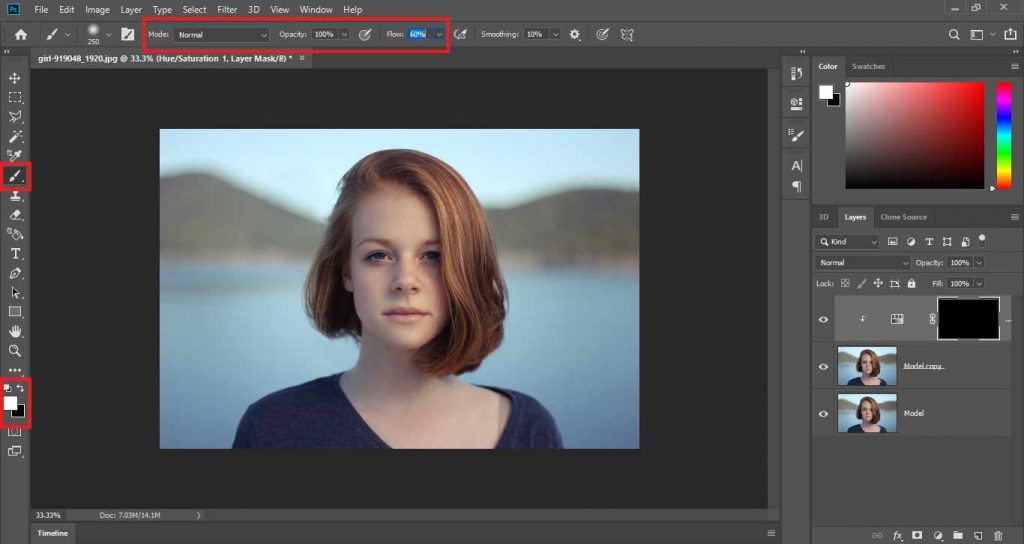
Now with Soft Round Brush paint over the hair areas with White color to get the Hue & Saturation effect on the hair.
Make sure to paint white on the Layer Mask rather than the Layer when painting on the entire head of hair or the section of hair you want to alter color.
If you accidentally painted on the other parts instead of hair you can remove the effect by changing the foreground color to Black and painting on the extra area.
You can toggle between Foreground and Background colors by simply Pressing X on the keyboard.
The more accurate you mask your effect, the more realistic the effect will look.
For a more realistic approach, you can decrease the flow to around 25% when painting on the scalps on the head to make the effect more blended in with hair.

Full Control On Colors
After masking you have complete control over the colors of your hair.
You just have to go to your Hue and Saturation Adjustment Layer.
Change the Hue to change the color of hair to any color you want and you can play with the Saturation slider also.
You can take the Saturation slider to -100 to get a remove color from hair and get black and white hair.
Related: Learn To Whiten Teeth In Photoshop In Just One Minute.

Conclusion:
Finally, this is how to change hair color in Photoshop in 5 simple and easy steps. Now you can change the color of the hair of anybody in just one minute.
Watch To Learn More Techniques:

I’m a Graphic Designer with 5+ years of experience. Specialized in Adobe Photoshop.
Get Info About Any Photoshop Editing, Photoshop Manipulation, Logo Design, Flyers, Business Card, Cartoon Portrait and any type of work-related to Graphic Design and Photoshop Editing.


