In this tutorial, we’re going to learn how to change eyes colour in photoshop quickly. The method I’m going to show you is the most realistic and non-destructive approach to do that.
We will learn a non-destructive method in which we use groups, Hue and Saturation Adjustment Layers, and Levels Adjustment Layers to complete the eye color effect.
You can rapidly change the colour of your eyes by applying the tips in this tutorial, but you’ll also learn how to use Hue and Saturation and other Adjustment Layers to change the colours of any desired items.
Related: Learn How to change the color of any object you want in Adobe Photoshop.
So follow my step-by-step method to learn how to change eyes colour in photoshop quickly and non-destructively.
Let’s Go For It!
Table of Contents
Opening Your Picture in Photoshop
First of all, you have to open the picture in Photoshop of which you need to change eyes color, and to do that you just have to Drag & Drop the picture in Photoshop.
One of the other ways is to go to File > Open.
Hue and Saturation Adjustment Layer to Change Eye Color
Now After opening your picture in photoshop the next thing we have to do is to change the Hue of the eye to our needs.
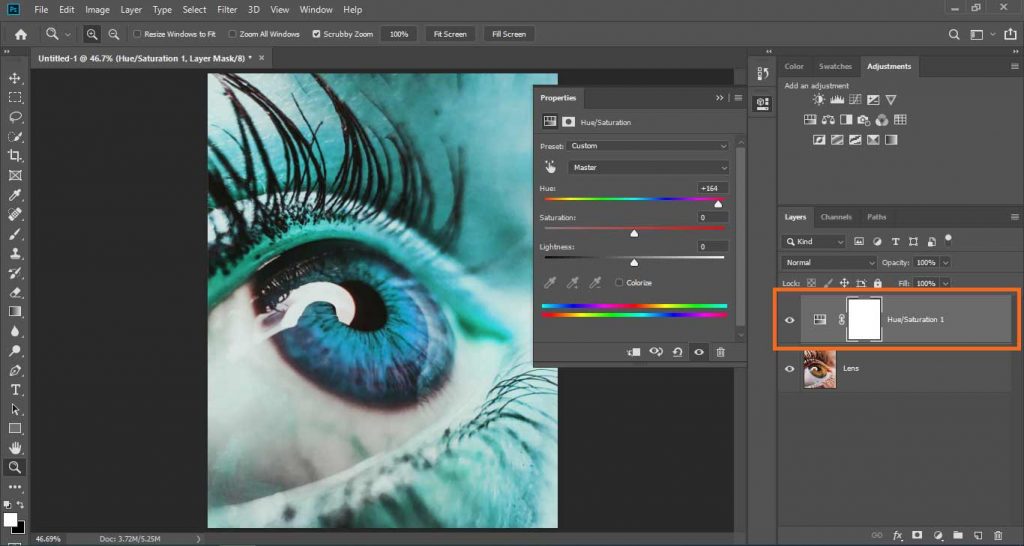
In order to do that, go to the Layers panel and click on the New Adjustment Layer icon > Hue/Saturation.
This will create a new Hue and Saturation Adjustment Layer and we can use it to change the color of any object we want.
Now go to the properties of Hue and Saturation Adjustment Layer and change the Hue slider to the value you need.
Don’t worry that the color of the whole image is changing we will solve that later but for now, just focus on the color of the eye changes as you change Hue.
Check the Colorize Feature
If you think only changing the Hue does not work well with the results of your eye then you can choose Colorize Feature.
By checking the Colorize box, you can colorize the whole layer as opposed to moving alongside the Hue slider that works with the eyes’ normal color.
With Colorize, it turns the entire image into a specific color, and you can change the color by adjusting the Hue slider and the Saturation slider to set the intensity.
As an example, you can set Hue as Blue color and Saturation to about 50+.
Don’t think about the luminosity here we’ll fix that later.

So when you get your value of Hue, click on the Layer mask of Hue and Saturation Adjustment Layer, make sure the foreground color is white and the background color is black, and press Ctrl + Delete (On Windows) or Command + Delete (On Mac) to make a layer mask white to black.
This will remove all the effects of Hue from the whole image but now here comes the fun part, select the brush tool.
In the brush properties, select a smooth-edged brush and paint with white over the eyeball means the pupil of the eye to apply that Hue effect on the eye.
Make sure the Layer mask of Hue and Saturation Adjustment Layer is selected, then where you will paint with white it applies the effect and where you will paint with black it will erase the effect.
So, if you accidentally painted outside the eye, just paint black there and it will be fixed.
Take your time and paint on the eye pupil precisely to get better and realistic results.

Use Levels Adjustment to Control Brightness Of Eye
We’ve changed the color of the eye but we need to change the luminosity of eye pupil because it may be brighter or darker in some cases.
The Lightness slider in Hue and Saturation Adjustment Layer does not offer the best result on lightening or darkening the color of the eyes.
Instead, we will use a separate adjustment layer to adjust the brightness of the eye.
In order to do it non-destructively, create a New Group from Layers Panel.
Click-and-drag the Layer Mask from the Hue/Saturation layer into the Group, so this single Layer Mask controls multiple adjustment layers.
We did this to avoid painting over again and again on the pupil of the eye, we have one mask already and we’ll use it on the group and keep all adjustments only limited to the masked area.
Then, click-and-drag the Hue/Saturation adjustment layer into the Group as well.
Now, go to Layers Panel and click on the New Adjustment Layer icon > Levels and add it to the group.
Utilize the Levels to alter the brightness and contrast by individually changing the Shadows, Midtones, Highlights, and Output Level sliders to accomplish the ideal effect.
You can also use the Brightness and Contrast Layer to change the lightness of the eye if you don’t want to mess with the Levels Adjustment.
Like in this example, the eye pupil is dark so I have to increase the brightness of the eye pupil to make it brighter.

Enhance Eye Color And Luminosity
In case you are working with light or brighter eyes, you might have to darken the eyes to accomplish the ideal color. However, this additionally brings about cleaned-out details and dull highlights.
If you also want to also learn how to change hair color in Photoshop, Click here!
To fix this, press Ctrl (On Windows) or Command (On Mac) as you click on the Group’s Layer Mask thumbnail to load it again as a selection.
Select the original image layer and press Ctrl + J (On Windows) or Command + J (On Mac) to duplicate it onto a new layer.
Click-and-drag the new layer into the Group.
Desaturate the layer by pressing Ctrl + Shift + U (On Windows) or Command + Shift + U (On Mac).
Then, change the Blending Mode of the layer to Vivid Light and decrease the Opacity.
If you decrease the Opacity and the highlights of the eye lose their intensity, check out the Levels adjustment layer and make sure that the Output Level slider’s Highlight point isn’t set to the gray area.
That’s the trick on how to change eye colour in Photoshop in a couple of steps and can dramatically improve your next portrait project!
Bonus Trick: Multi-Colored Eyes
Now as you’ve learned to change eye colour in photoshop or we can say you have learned to add colored lenses to eyes in Photoshop.
Here we have a fun bonus trick for you to make Multi-colored eyes. This will have more than one color in the eye and it’ll take your portrait project to the next level.
To do that we just have to make the first Hue/Saturation adjustment layer, tick Colorize, choose a color of your choice from Hue, invert layer mask, and with the Layer Mask selected only paint over the part of the eye where you want that one color.
Similarly, make a second Hue/Saturation adjustment layer, tick Colorize, choose a different color of your choice from Hue, invert layer mask, and with the Layer Mask selected only paint over the other part of the eye with white.
Similarly, make a third Hue/Saturation adjustment layer, tick Colorize, choose a different color of your choice from Hue, invert layer mask, and with the Layer Mask selected only paint over the other part of the eye with white to get that color on that part of the eye.
You can have multiple colors in your eye lens by doing this technique.


I’m a Graphic Designer with 5+ years of experience. Specialized in Adobe Photoshop.
Get Info About Any Photoshop Editing, Photoshop Manipulation, Logo Design, Flyers, Business Card, Cartoon Portrait and any type of work-related to Graphic Design and Photoshop Editing.


