We are here to learn the main concept of making any banner as well as how to make a twitch banner in Photoshop. For any twitch banner design or twitch banner template, we need some key elements in the banner.
Those key elements are your logo, your main text, and of course, your design.
You can add an image if you want to but if these elements are completed in your banner then you are good to go.
This article will help you a lot about designing banners and making twitch banner templates and you’ll be a twitch banner maker.
Table of Contents
Twitch Banner Size:
On twitch we have many graphics to use on our accounts, those twitch banner sizes are:
| Graphics | Sizes |
| Profile Photo | 800 × 800 px |
| Profile Banner | 1,920 × 480 px |
| Video Player Banner | 1,920 × 1,080 px |
| Video Thumbnail | 1,280 × 720 px |
| Cover Image | 380 × 1,200 px |
| Info Panels | 320 × 200 px |
In this tutorial, we’ll design a twitch Profile banner that includes all the essential elements. Then after learning those techniques, you can apply these techniques to any size of banner you want.
This tutorial is written for beginners as well as advanced Graphics Designers. If you’ve never used Photoshop before, you should get familiar with these concepts in Photoshop.
So, Let’s Go For It!
How to Make a Twitch Banner in Photoshop In 8 Easy Steps
Step 1: Setting Up a Banner Design File
In Photoshop, go to File > New. Name the document of your choice for the twitch banner. Set the file to the following dimensions:
- Width to 1920 px
- Height to 480 px
- Orientation to Landscape
- Resolution to 300 px
- Color Mode to RGB
Then click Create.
This is the actual size of a Profile Twitch Banner Design.
Step 2: Adding Background
First of all, we have to add a black background to our banner because it will be the base of our design so it should be simple but attractive.
In this tutorial, I’ll be designing a PUBG Gaming related Twitch Banner as an example. But these techniques can be applied to any other banner design.
Go to Layers Panel and add a Solid Color Adjustment Layer and take a blackish color.
Color Code: 202020.
After that, you have to add a rectangular shape with grey color and rotate it to make a design as I’ve done in the below picture.
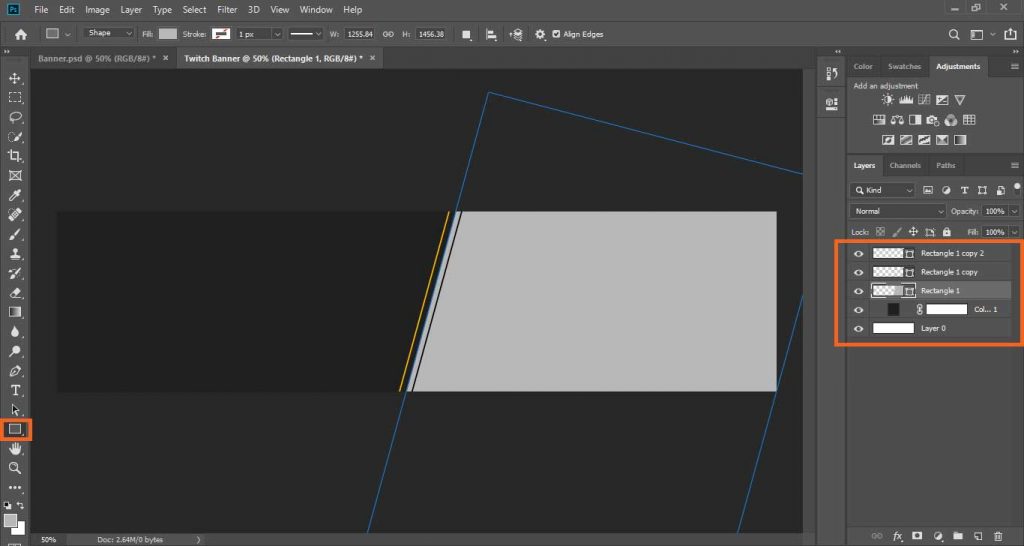
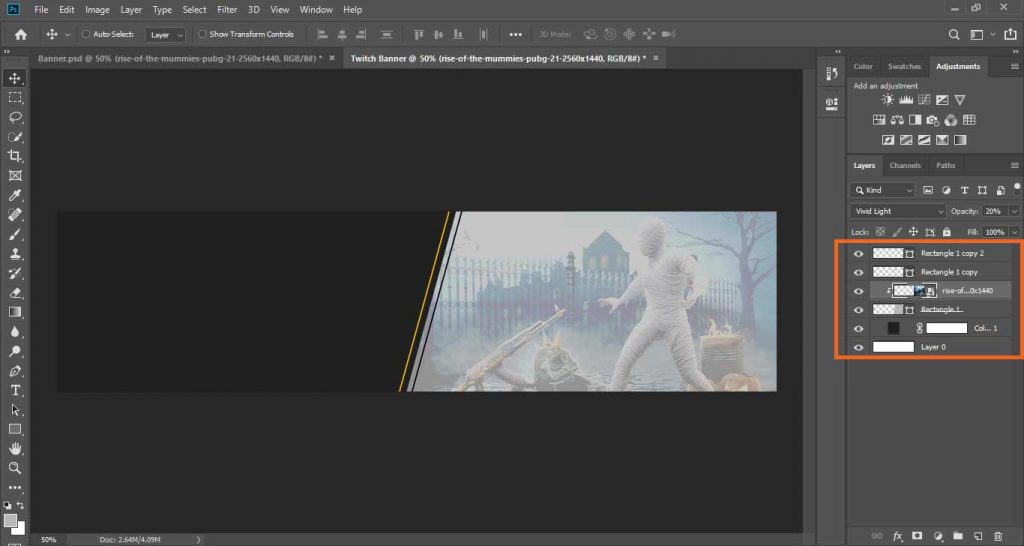
Now we have to get a PUBG wallpaper, drag and drop it on the grey rectangle, and clip masks it on the grey rectangle.
Now change the opacity of the wallpaper layer to about 15% to 25%.
In order to do that, download wallpaper from any website like HQWalls then place the wallpaper above the grey layer and right-click on the wallpaper layer, and click on Create Clipping Mask to make it only limited to Grey Rectangle.
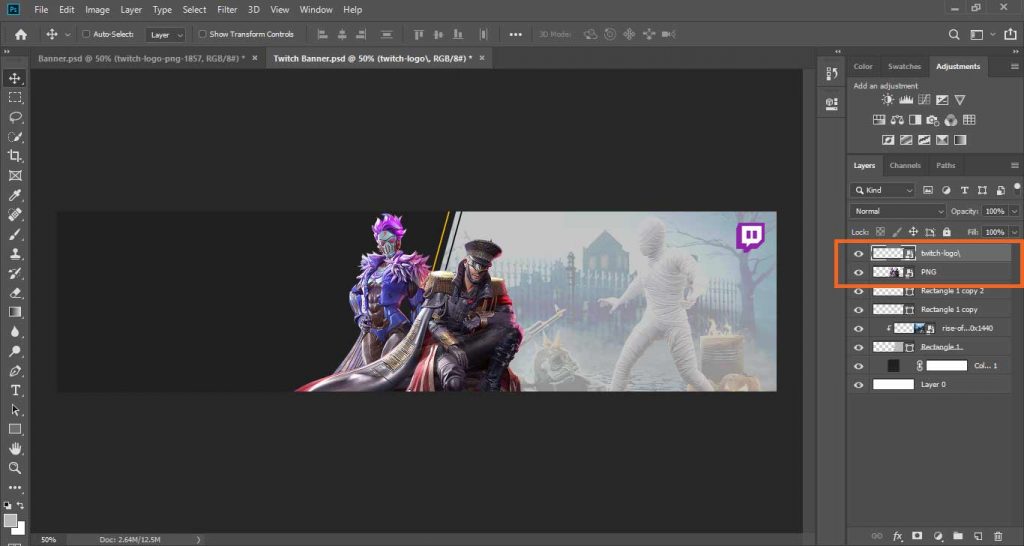
Step 3: Importing PUBG Game Character to the Banner
After making a background, we have to add our asset images like in this example, I have a character of PUBG Game so I’ve imported it and aligned it on the Center of the banner document.
You can import any image (Image of Game, Image of yourself) here you want to showcase in your twitch banner, then resize and align it anywhere you want.
Note: The image of yours or character image should be PNG with no background.
Related:
- If you wanted to learn how to remove background of any image. Click Here!
- Also learn to make any Logo or Illustration Transparent Here!
- Learn to Smooth Selection after removing Background.
Step 4: Adding Logo
Now the next part is optional, you can import the twitch logo if you want like I did in the example or you can also take your profile logo.
You can also add the import logo of your gaming profile to the document by simply dragging and dropping on onto the canvas, making it small, and aligning it on the top left of the canvas.
Step 5: Adding Our Main Text or Our Twitch Profile Name
Now we have a background with the character aligned on it. So, we have to add our main text.
For this, just go to the text tool and select the font you want to use. In my case, I’ll use Morganite Black Italic and I’m typing an example name XAVIER.
Align the text at the left of the banner to make it look elegant.

If you want to download this specific font family. Click Here!
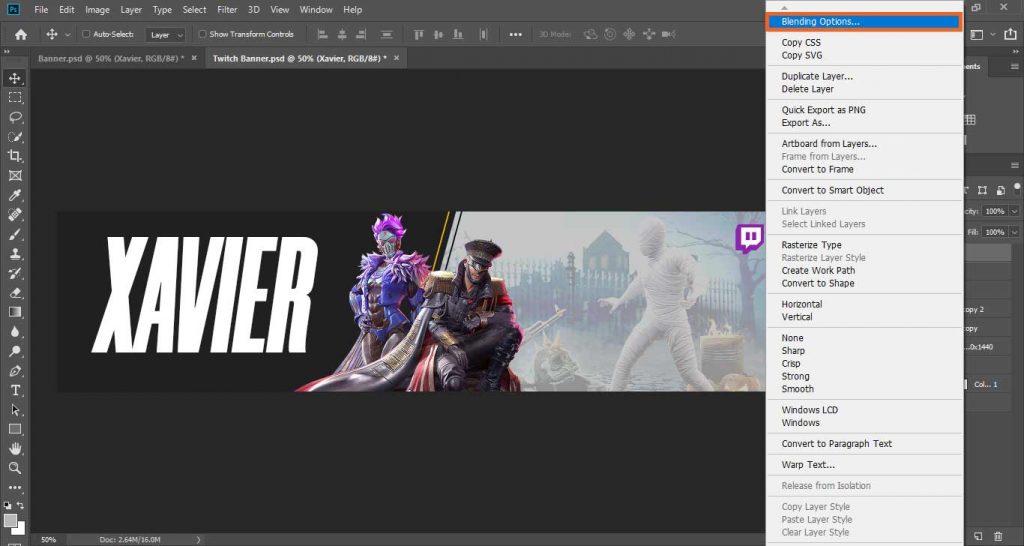
Now we can also add a gradient to our text and to do that right-click on the text, click Blending Options.
Then select Gradient Overlay and add a gradient of your choice. For this example, I’m just adding a simple grey and white gradient to it.
Pro Tip: You can make your own gradient by selecting two colors for it or you can also download some professional gradients and add them to your Photoshop.
After that, you have to make a duplicate of the Text layer by using Ctrl + J or Cmd + J and make it stroke only and in order to do that, go to the Layers panel set the fill of the duplicate text layer to 0%, and then right-click on the layer and select Blending Options.
Note: Make sure to hide or uncheck Gradient Overlay for duplicated text so that Fill set to 0% hides all text except strokes.
In blending options, select Stroke and set its color to white and size to 1, and click OK.
Then in the layers panel, drag the duplicate text layer which is stroke only, and place it below the main text layer.
Then with the help of arrow keys on the keyboard, move the stroke only text downwards and towards the right to make a professional look.
We have our main text ready!

Step 6: Adding Taglines
After that, we have to add another text of the banner and that is adding Tagline or your real name or whatever you want.
For this specific design, you have to add a stroked box and add your text inside it.
To do that, select Rectangle Tool.
In the settings of Rectangle Tool, set it to Shape, set Fill to None, Stroke to White color, and Stroke size to 2 pixels.
Left-click on the canvas and set the Width to 600 pixels, Height to 45 pixels, and click OK.

(You can change the size of the box according to your text I’m using this as an example.)
Align the square at the bottom of the main text.
Now add text of tagline by selecting Text Tool and setting the font to Montserrat Extra Light.
If you want to download this specific font family. Click Here!
For this, I’m going to type PlayersUnkownBattleGround, resize, and align it inside the stroked box.
You can also add the gradient to the tagline and the method is as same as we did for the main text.
So we have our Tagline ready!

Step 7: Adding Social Media Accounts
Now we can also add our other social media platforms here and to do that just get some social media icons from Google, place them and align them where you want.
Then add the names of your social media accounts in front of them.

Step 8: Extra Adjustments (Light Glow)
We have our banner ad ready to use but to make it more catchy and professional, we have to add a light behind the character to make it pop.
For this specific design, I am going to use a yellowish-orange color. And also orange represents energy and speed so it fits in this banner.
Make a new layer below the character and above the background layer.
Select Brush Tool and take a Soft Round Brush. With the size of 650 px to 700 px, paint a dot beneath the model on the new layer.
You can set the Blending mode of Light Layer to SoftLight.

This will give an elegant and energetic look to the whole design.
Conclusion | How to Make a Twitch Banner in Photoshop

So we’ve learned how to make a twitch banner in Photoshop in simple steps. You just have to follow the main steps and you can make any design of banner on any size.
I really hope you learned a lot from this essay on creating twitch banner templates and designing banners. You’ll also create Twitch banners. You can leave a comment below if you have any questions.
Happy Editing!

I’m a Graphic Designer with 5+ years of experience. Specialized in Adobe Photoshop.
Get Info About Any Photoshop Editing, Photoshop Manipulation, Logo Design, Flyers, Business Card, Cartoon Portrait and any type of work-related to Graphic Design and Photoshop Editing.


thanks, interesting read
Скидка 20% на окна ПВХ при оформлении заявки на сайте https://okno.ooo/articles/331-balkon-s-vynosom-tsena-v-okna-plastik
В основе нашей философии — любовь к людям https://okno.ooo/images/works/14-02-2018/osteklenie-balkona-14022018-1.jpg
Вы всегда можете рассчитывать на поддержку, дружелюбие и сердечное отношение https://okno.ooo/images/FOTO/VseOkna/osteklenie-balkonov-10.jpeg
ХОТИТЕ РАССЧИТАТЬ СТОИМОСТЬ СВОИХ ОКОН?
Цены на наши пластиковые окна https://okno.ooo/articles/184-odnokamernye-okna
И мы дорожим каждым!
ДОРОГИЕ ИЛИ ДЕШЕВЫЕ ПЛАСТИКОВЫЕ ОКНА?