You’re not alone if you’re having trouble figuring out how to crop a layer in Photoshop means crop an image in Photoshop without cropping the background.
Although Photoshop has a Crop Tool, it will crop your entire canvas, not just one layer.
This can be very frustrating if all you want to do is adjust and crop the edges of one layer. Thankfully, there are a few straightforward (and less obvious) approaches to cropping a single layer in Photoshop.
Table of Contents
Does Crop Tool Allow to Crop Individual Layers?
The Crop Tool’s limitation is that it can only crop the entire canvas. This implies that it will crop all of your layers and modifications as well.
Let’s take a look at how your layers and canvas function to help you understand a little better. The conclusion of all of your layers is your canvas.
When you combine all of your baking ingredients in a bowl, you only see the result of each component when combined. That’s what your canvas displays: the result of all your layers together.
Your layers are separate elements of a larger picture. They all work together to generate a finished result, much like the layers of an onion.
The difference between food and Photoshop is that layers in Photoshop can be changed at any time. In this manner, you may fine-tune and improve the appearance of your final shot as it appears on the canvas.
So, what does this have to do with cropping a photo in Photoshop?
It’s easy to see why the crop tool doesn’t work for individual layers if you grasp how layers work.
The Crop Tool can’t impact layers individually because it only affects the ‘end product’ (or your canvas).
Without using the Crop Tool, there are a couple of effective ways to crop a layer in Photoshop.
Three Easy Ways to Crop a Layer in Photoshop
Let’s get back to what matters now that you’ve remembered the Crop Tool. The Photoshop tools that will genuinely assist you in cropping a layer without cutting background!
Each of these techniques has its own set of benefits in specific scenarios.
Which strategy you employ will be determined on how you want to crop the layer or you can say crop the image without cropping the background of the image.
Before implementing any of the above method, we will suggest you a best laptop for designing that allow you to do your work like a pro.
Marquee Tool Crop – The Basic Cropping Method
The Marquee Tool in Photoshop is a basic selection tool that allows you to draw a selection.
The Rectangular Marquee and the Elliptical Marquee are the two options available with the Marquee Tool.
By hitting M or looking for it at the top of your toolbar, you can access one of these tools.
Note: To access the additional tool options, click and hold the Marquee Tool icon.
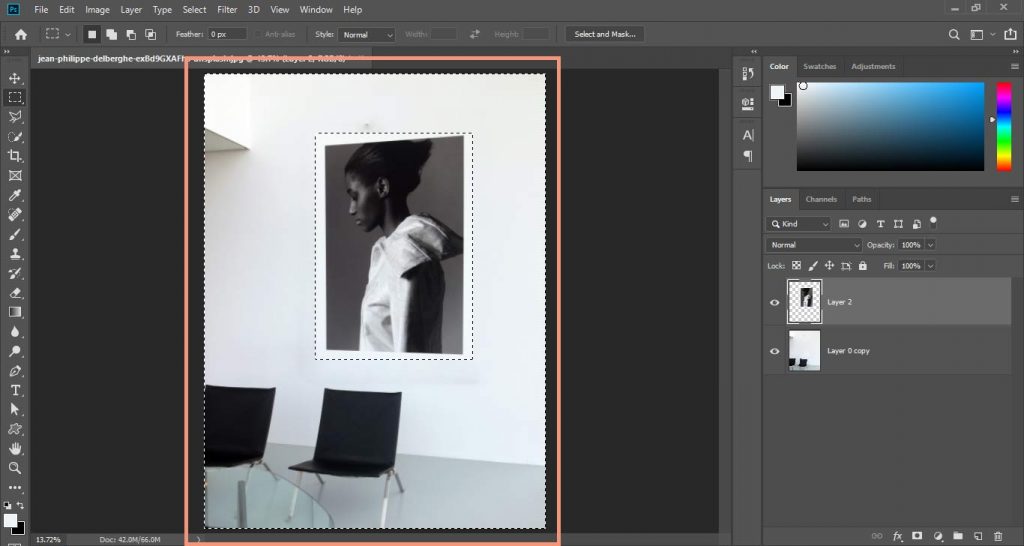
This utility operates in a straightforward manner. To make a selection, click and drag anywhere on your image. I want to crop the layer into a square form in this situation, therefore I’ll make a square pick.
Pro Tip: While holding down the mouse, press and hold the space bar to move your selection around. This makes fine-tuning your final crop much easier.
A black and white line will now appear on your photograph. Marching ants are a type of ant that represents your selection.

If you don’t like the selection and want to start over, press Command + D (Mac) or Control + D (PC). Continue once you’ve made your selection.
Select the layer you want to crop in your layers panel. Keep in mind that it will be cropped to fit the shape of the active Marquee selection.
You now have a choice between two options.
Option 1:
Cropping the layer by eliminating the surplus is the first option. This will make your changes permanent, and you won’t be able to change them later. You can say it Destructive Way of Cropping Layer.
Option 2:
The second method is to make a layer mask and trim the layer after masking out the surplus. If you think you made a mistake, you can refine this selection later. This will be a Non-Destructive Way of Cropping Layer.
I recommend utilizing a layer mask, but I’ll show you how to do both so you can make your own decision!
Destructive Way to Crop
Make sure your Marquee Selection is set to the way you want it and select the layer you want to crop.
To invert your selection, press Command + Shift + I on a Mac or Control + Shift + I on a PC. Everything outside of your initial Marquee selection will now be selected.
Press the Delete Key after that.
Everything that isn’t part of your Marquee will be removed. To deselect, use Command + D (Mac) or Control + D (PC).
With just a few clicks, you’ve successfully cropped a layer in Photoshop! Remember that this procedure is permanent, and you won’t be able to change your crop afterward.
With that tips now its time to shift on drawing tablet that will save your time and increase your work quality.
Try the next step for a less permanent or you can say non-destructive cropping alternative!
Non-Destructive Way to Crop
Double-check that your Marquee Selection is positioned correctly on the layer you want to crop.
Click the layer mask icon at the bottom of your layers panel while your selection is active. This will apply your selection to a layer mask automatically.
Everything outside of the selection has vanished, leaving you with a perfectly cropped layer. Next to your cropped layer, you’ll see a layer mask.

If you’re unfamiliar with layer masks, here’s how they work:
Anything on your mask that is black is completely translucent, while everything that is white is completely visible. Any shade of grey between black and white will represent distinct transparency levels.
This implies that while sections of your layer appear to be ‘removed,’ they are actually hidden. The photo would become visible again if you used a white brush to paint over the black areas of your layer mask.
Related: Learn all about Layer Masks and how to use them in Photoshop (The Ultimate Guide)
You’ve now mastered how to use the Marquee Tool in Photoshop to crop a layer! This is one of the simplest methods for cropping layers, however, the shapes you can crop to are limited.
Fortunately, the next two ways will teach you how to remedy this issue!
Shape Tool Crop – Cropping A Layer Into A Specific Shape
You learned a simple technique to crop a layer and a more custom way to crop a layer with the Pen Tool which we’ll learn in the next method.
So, what if you want to crop your picture into a specific shape? If you’re anything like me, you’re not naturally gifted at sketching shapes by hand. Fortunately, you can use the Form Tool to crop a layer into a shape!
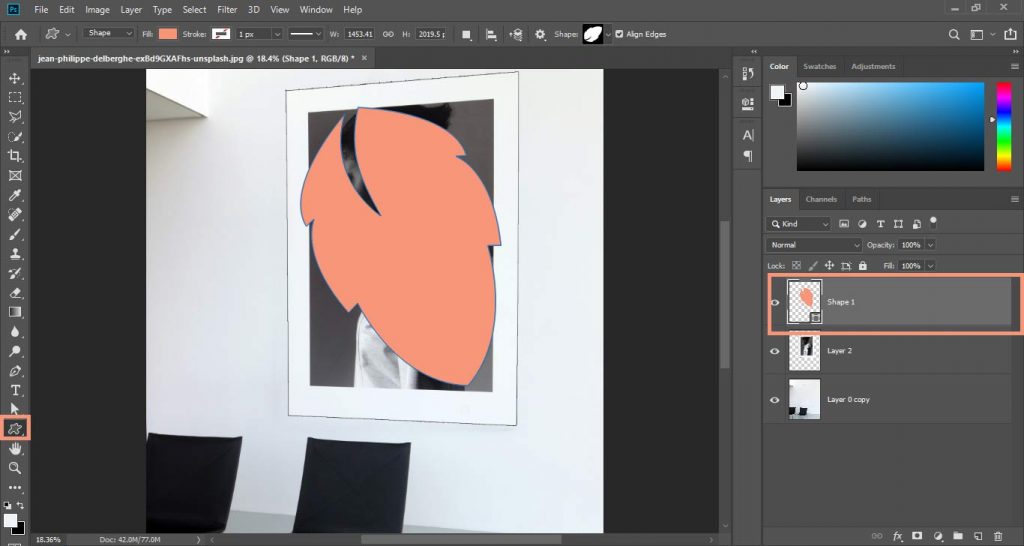
By hitting U or selecting it from the toolbar, you can access the shape tool. You can go to the bottom of the toolbar to see it. I’d like to crop the layer into a flower shape in this situation.
I’ll use the custom shape tool and pick a Leaf shape from the preset shape options to make things easier. The next stages are the same regardless of which shape you choose.
Drag the shape onto your canvas by clicking and dragging it. There will be a new form layer created.
Here is a best mouse pick for you that best for cropping.
Click on your shape layer thumbnail while holding Command (Mac) or Control (PC). This will create a selection out of your shape.
In your layers panel, select the layer you want to crop. Now you must decide whether to crop the layer using the delete approach or the layer mask method.
To invert your selection for the delete technique, press Command + Shift + I (Mac) or Control + Shift + I (PC). Then to crop the layer into the shape, use the Delete Key.
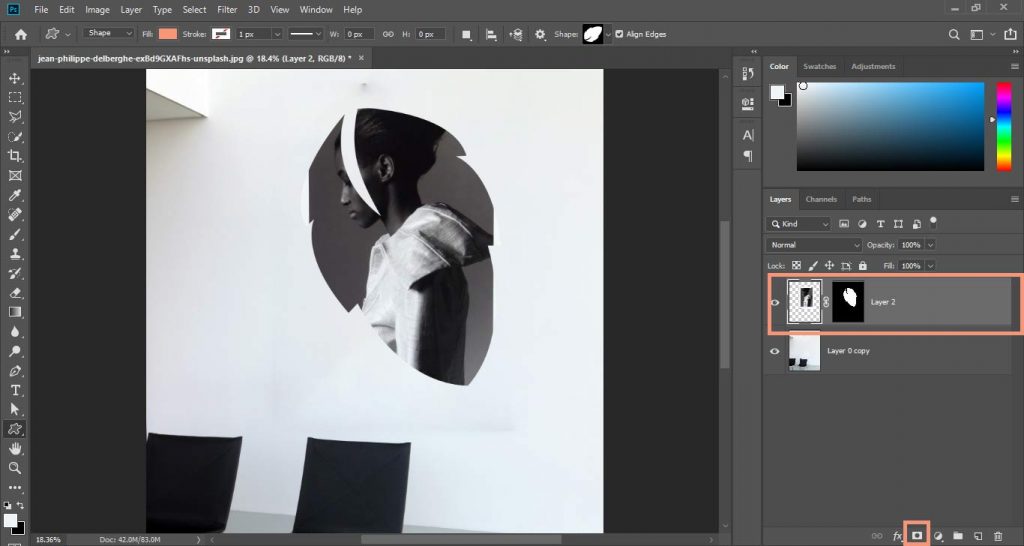
To use the layer mask approach, go to the bottom of your layers panel and click the layer mask symbol. A white outline of your shape will be seen in the new layer mask.
After you’ve completed either of those steps, select your shape layer and press delete to remove it. You’ll now have a perfectly cropped layer that matches the shape!
One of the more underappreciated Photoshop techniques is cropping a layer with the Shape Tool. The Shape Tool isn’t commonly used to produce selections, but it’s a useful tool nonetheless. You can easily crop a layer into any shape using this method and can also check invert layer method!
Pen Tool Crop – Customizable Layer Cropping
The Pen Tool in Photoshop goes a step further by allowing you to fine-tune your layer cropping. Using anchor points, you may design a custom selection in almost any shape you can think of.
Press P or look for it in your toolbar to get to the Pen Tool.
A little square will appear when you click anywhere on your image. This is referred to as an anchor point.
As you keep clicking, more anchor points appear, each connected by a small line. These lines come together to form a pen path but just think of it as your crop selection.
When creating a new anchor point, click and drag to bend your pen path around an edge. By holding Command (Mac) or Control (PC) and clicking on the desired anchor point, you can reposition it.

Connect your pen path back to the starting place once you’ve finished creating the shape.
Make a selection by right-clicking in the path and selecting ‘Make Selection’. Set the radius of your feathers to 0.
Now that your path has been turned into a selection, go to your layers panel and select the layer you wish to trim.

You have the option of using the delete or layer mask methods once more.
To invert your selection for the delete technique, press Command + Shift + I (Mac) or Control + Shift + I (PC). Now to crop the layer, press the delete key.
To use the layer mask approach, go to the bottom of your layers panel and click the layer mask symbol. Your photo will be cropped and a layer mask will be applied. This mask can be changed at any time!

The possibilities with this tool are endless because you may manually sketch out the exact crop you desire!
Conclusion | How to Crop a Layer in Photoshop Without Affecting Other Layers?
Here we learned how to crop an image in Photoshop without cropping the background. Cropping a layer into a simple rectangular shape isn’t always desirable.
Instead, use the Pen or Shape Tool to create more creative crop customizations. You’ll be prepared for any situation if you know how to crop a layer in Photoshop in three different methods.
FAQs: How to Crop a Layer in Photoshop?
Open Photoshop and select your image.
Make the background layer accessible.
Establish a New Layer.
Choose the Area of the Picture You Wish to Crop.
Flip the Picked Items.
Cut the Selected Area in Step Six.
Deselect is step seven.
For cropping only the image you can use one of the above methods and crop a layer in photoshop like a pro.
For cropping a layer without affecting other layers:
Choose the layer that you wish to crop.
Select the Rectangular Marquee Tool in Step 2.
Decide which region to preserve.
Use Transform Selection to resize the selection.
Reverse the choice.
Crop the layer in step six.

I’m a Graphic Designer with 5+ years of experience. Specialized in Adobe Photoshop.
Get Info About Any Photoshop Editing, Photoshop Manipulation, Logo Design, Flyers, Business Card, Cartoon Portrait and any type of work-related to Graphic Design and Photoshop Editing.


