
Wanted to Learn How to Add an Image in Photoshop? You may use Photoshop’s layering function to combine multiple photos for a variety of applications. For example, you can use several images to create special effects that will attract a viewer’s attention, or you can use your company’s emblem as a watermark on top of a product shot.
Add a picture as a new layer if you already have one that you want to use in your Photoshop project.
To add an image Simply:
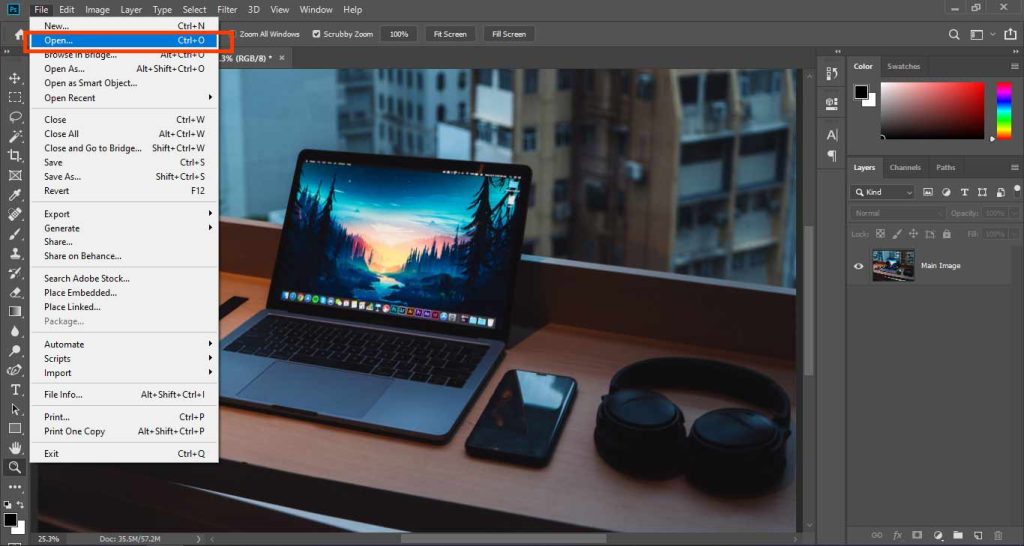
- Open or create the Photoshop project you wish to alter in the first place.
- In the Photoshop window, drag and drop the new image. You can alternatively choose the image file from the “File” menu, click “Open,” and then click the “Open” button.
- To confirm and add the image as a new layer, use the “Enter” key. To roll back if you accidentally uploaded the wrong image to the project, press the “Escape” key.
Table of Contents
How to Place any Image in Any Image like a Mockup (Smart Objects in Photoshop)
Let’s First of all learn what Smart Objects are and why they are used in Photoshop.
What Is a Photoshop Smart Object and why do we use them?
A Smart Object layer in Photoshop has all of the same picture information as a regular layer, but it also allows you to make non-destructive adjustments. You can, for example, resize the image as many times as you like without it degrading. Later in the article, I show this.
In addition, Smart Objects enable you to apply non-destructive filters to them, which I will explain in the upcoming article. The following is a list of Smart Objects’ benefits:
- Perform non-destructive picture modifications. Without sacrificing any of the original image quality, you can resize, rotate, skew, distort perspective, and so on.
- Filters that aren’t damaging (Non-Destructive) should be used.
- You don’t have to convert vector graphics from Illustrator or other comparable applications to pixels before embedding them.
- If you have many duplicates of an image, you can modify one and have all of them updated at the same time.
- Separate masks can be added to filter adjustments.
A Smart Object layer’s pixels cannot be edited directly. You can’t paint, dodge and burn or clone straight onto a Smart Object, for example.
For many photographers, this is a disadvantage, and it becomes a reason to avoid using Smart Objects. By double-clicking on a Smart Object’s layer, you can change it directly. This places the Smart Object in its own window, allowing you to make changes to it.
You can also duplicate the Smart Object and place it on a layer above it. Both methods help to ensure a non-destructive workflow.
Making Your Own Smart Object to Place Image in It
Now we’ll make our own smart object to place any image inside it non-destructively. The benefit of smart Objects is that we can change images at any time and place a new one whenever we need.
We don’t have to repeat the whole process again and again.
Let’s Go For It!
Step 1: Opening The Main Image
Obviously, First of all, we have to open the image in Photoshop on which we have to place any other image.
To do that just drag & drop the image on Photoshop or you can go to File > Open to open an image in Photoshop
Step 2: Creating a Shape (Rectangle) and Make it a Smart Object
Now next thing is to create a shape and the shape should be like the element or object in the main image on which we want to place our new images.
Like in this example, I’ve taken a laptop and we have to add a smart object on its screen so that we can change it anytime.
For that, I’m going to make a Rectangular shape.
Just go to the Rectangle Tool (U) and make a rectangle of the size of your choice with the color of your choice.

Now after making the shape (Rectangle), we have to make it a Smart Object so that we can place the image inside it.
To do so go to Layers Panel, right-click on the Layer of Rectangle and select Convert to Smart Objects.

Step 3: Transform the Shape to the Element
The next step is to transform the shape so that it can fit on the object of the main image on which we wanted to place the other images.
For this example, let’s first just resize the Shape a little bit to the laptop screen.
To do that just press Ctrl + T on PC or Command + T on Mac, resize it and then right-click on it and select Distort.
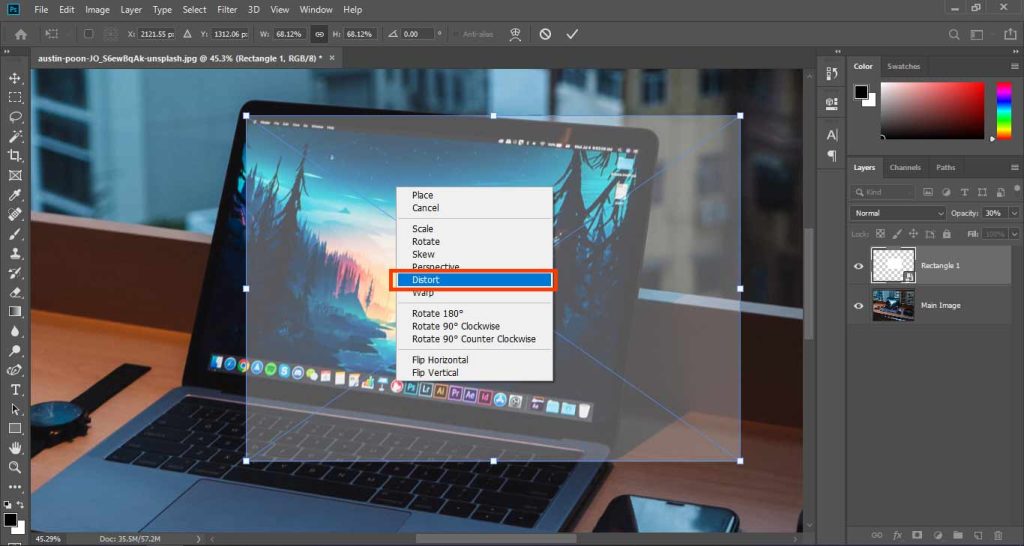
Now take the corners of the rectangle one by one and place them according to the laptop screen corners.
Note: You can decrease the Opacity to 30% – 40% just for your convenience so that shape fits the element perfectly. Set Opacity to 100% after resizing.
Arrange the rectangle on the screen and press Enter.
Now your Smart Object is ready to place the image on it.

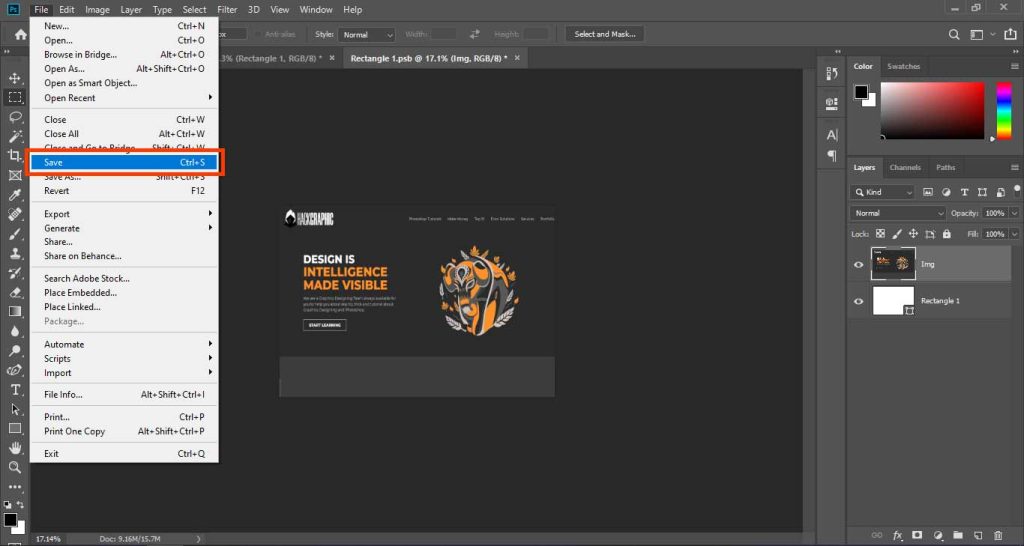
Step 4: How to Use Smart Object in Photoshop
To use this Smart Object and place image inside it.
Go to the Layers panel and double click on the Thumbnail of the Rectangle Layer which is a Smart Object.
Or you can just right-click on it and click Edit Contents.

This will open a new document in which there is only that rectangle.
Now place any image on it.

Then press Ctrl + S on Windows or Command + S for Mac.
Or just go to File > Save.
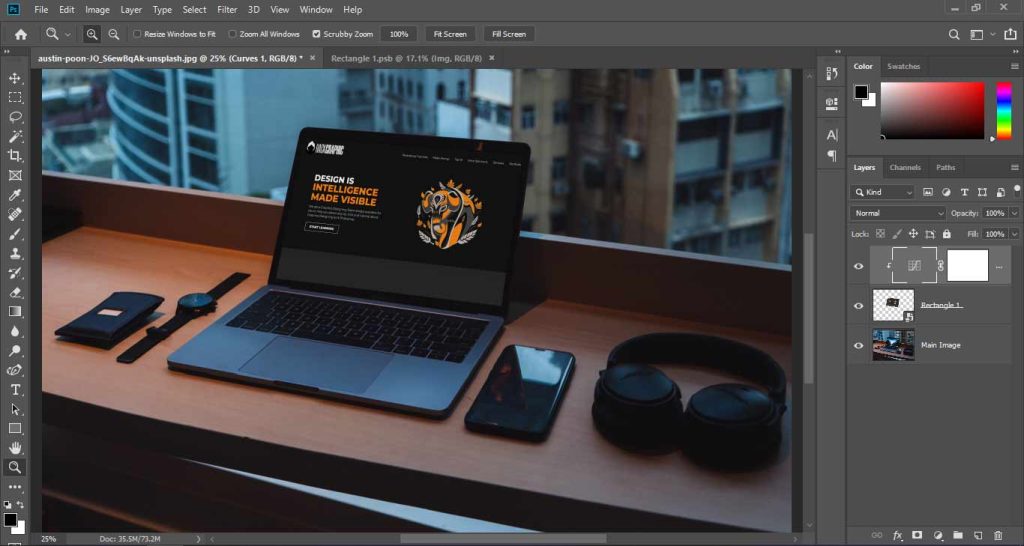
Now go to your Original document and Boom! You have your image on the Main Image (Laptop).

Step 5: Some Extra Retouches
The image you placed on the object may not look so realistic or it may not matches the environment correctly.
Just make a Curves Adjustment Layer above the Smart Object layer and make changes by which the image becomes more matching with other environments.
As for this image I’ve just decreased brightness and contrast a little bit. But it will differ from picture to picture.
Related: Learn in-depth How to match any object & person with the background.
Reuse
You can use and insert photos whenever you want now. Simply modify that Smart Object and click once to insert the new image.
Related: How to Make a Business Card in Photoshop (Premium Quality)
Final Words | How to Add an Image in Photoshop
We’ve learned to just add any image in Photoshop and then we’ve learned how to add any image by making a Mock-Up using Smart Objects.
Hope you’ll find it easy.
Have a GOOD Day & Happy Editing!

I’m a Graphic Designer with 5+ years of experience. Specialized in Adobe Photoshop.
Get Info About Any Photoshop Editing, Photoshop Manipulation, Logo Design, Flyers, Business Card, Cartoon Portrait and any type of work-related to Graphic Design and Photoshop Editing.


